Showing posts with label Pockets. Show all posts

Wednesday, 1 May 2019

I Have a Confession. I Have a Coat Fetish. Here's My Latest Sewing Pattern Review: The Rebecca Page Andie Anorak

Friend: I LOVE your coat!

Me: Thanks!  IT HAS POCKETS!

That's pretty much my attitude about coats. Pants. Tops. Life.

Pockets make things better - especially on the Rebecca Page Andie Anorak Sewing Pattern!


Andie is a nice coat for layering layers of clothes underneath - but being an A-Line jacket means it doesn't look boxy or bulky.

Options include:
- Detachable hood
- Epilates Optional
- Optional Sleeve buckles
- Optional Oversized Pocks
- Optional Hood Belt  & Buckle
- Hip or Knee Length


I LOVE the inside lining. It's so easy, and everything just pulls through one small side seam, thus minimal hand sewing required to completed this fully lined jacket.


See the pocket!  You can opt to have the pocket cover or not (brain fog - whatever that part is called where the buttons above are - you know the word - welcome to my brain/life).

I did originally order buttons from a new Etsy store, however, the buttons arrived yesterday.  The coat was finished a week and a half ago!  I did manage to find some cute black with gold fleck buttons at Walmart - 3/$1.  I did have to use a few snaps for the hood, as there were only 12 available buttons at Walmart when I went in.

I needed the gold sparkle. You'll find out why soon!


See - I told you - you'd find out soon! 

I've been hoarding this Wizard of Oz cotton fabric for about a year now.  I purchased it at $2.50/metre for a different pattern test final that never continued on beyond the version 1 test phase.  So it's been sitting. And waiting. And Andie came around. 

The turquoise-hunter green cotton fabric is another long time hoard that thankfully goes with the Wizard of Oz emerald/magical feel, and gave me enough fabric for the front panels.

Both were from Fabricland, a local Canadian store that is slowly being weaned out by the online fabric industry.

If you look closely at the top picture, you can see a me-made tag (I printed reversed onto fabric paper, and then ironed it onto twill tape, cutting out each tag - so much cheaper than ordering custom tags online!). 

Also, there is a hanging loop - because every coat needs a hanging loop!


Look at that hood!  And the back yoke!  And that lovely back pleat! 

Honestly, this has to be my best coat ever. And yes, I'm tooting my own horn!  The yoke just brings the A-line framing together.

And my lining and main fabrics are perfectly aligned with no bagginess than I've encountered with my first few coats last year.


Oh - the main fabric - that's also from Fabricland. Purchased for office pants I never made.  And now that our office has become casual dress (except if we're meeting up with our clients/partners), and I work from home 4.5 days of the week - Andie screamed to use up this lovely lightweight suiting fabric.

You can see the shoulder tabs - aren't they cute? 

I was going to do buckles, but for the life of me couldn't find buckles down the street, or online that would ship quickly enough. And to drag my behind to one of the fabric stores that also likely wouldn't have buckles -meh.  Next time I can plan ahead to have everything I need before I need to start the project.

I'd love a longer waterproof version of the Anorak - and walk around with a fascinator on my head, because I feel that's what would really bring this coat all together.

Who doesn't like a good fascinator?


Get your Andie Anorak here, take your time sewing, and make yourself a coat you'll be proud to call your own!

***Affiliate Links Above used - I love these patterns, and without the help of those who love their patterns, marketing would be extremely difficult for the pattern makers we love and learn to love. Affiliate links help with the hours, fabric, and tears that go behind testing each pattern in order to provide a real-person view on the patterns for you (and me!) 

Tuesday, 2 October 2018

Won't You Be My Neighbour? 5 out of 4's Eleanor Cardigan Pattern

I love a cardigan that lets me move and groove.  Like this:


Let's make the most of this beautiful day...with 5 out of 4's Eleanor Cardigan Pattern!  


The options the Eleanor pattern includes are:
- Mid thigh, knee, or duster length
- Optional Hood
- Band hem
- Optional Tie belt
- Optional Elbow Cuff
- Optional Pockets
- Optional long sleeves
- Womens or Girls Sizing


It's meant for sweater knits with at least 15% stretch - but I kind of cheated, aka no fabric month September/October, as we have to pay for some advanced medical testing for my Vestibular Migraines that may help bring me back to working in the office and coming out of my dark cocoon of no/low-lighting Golem life.

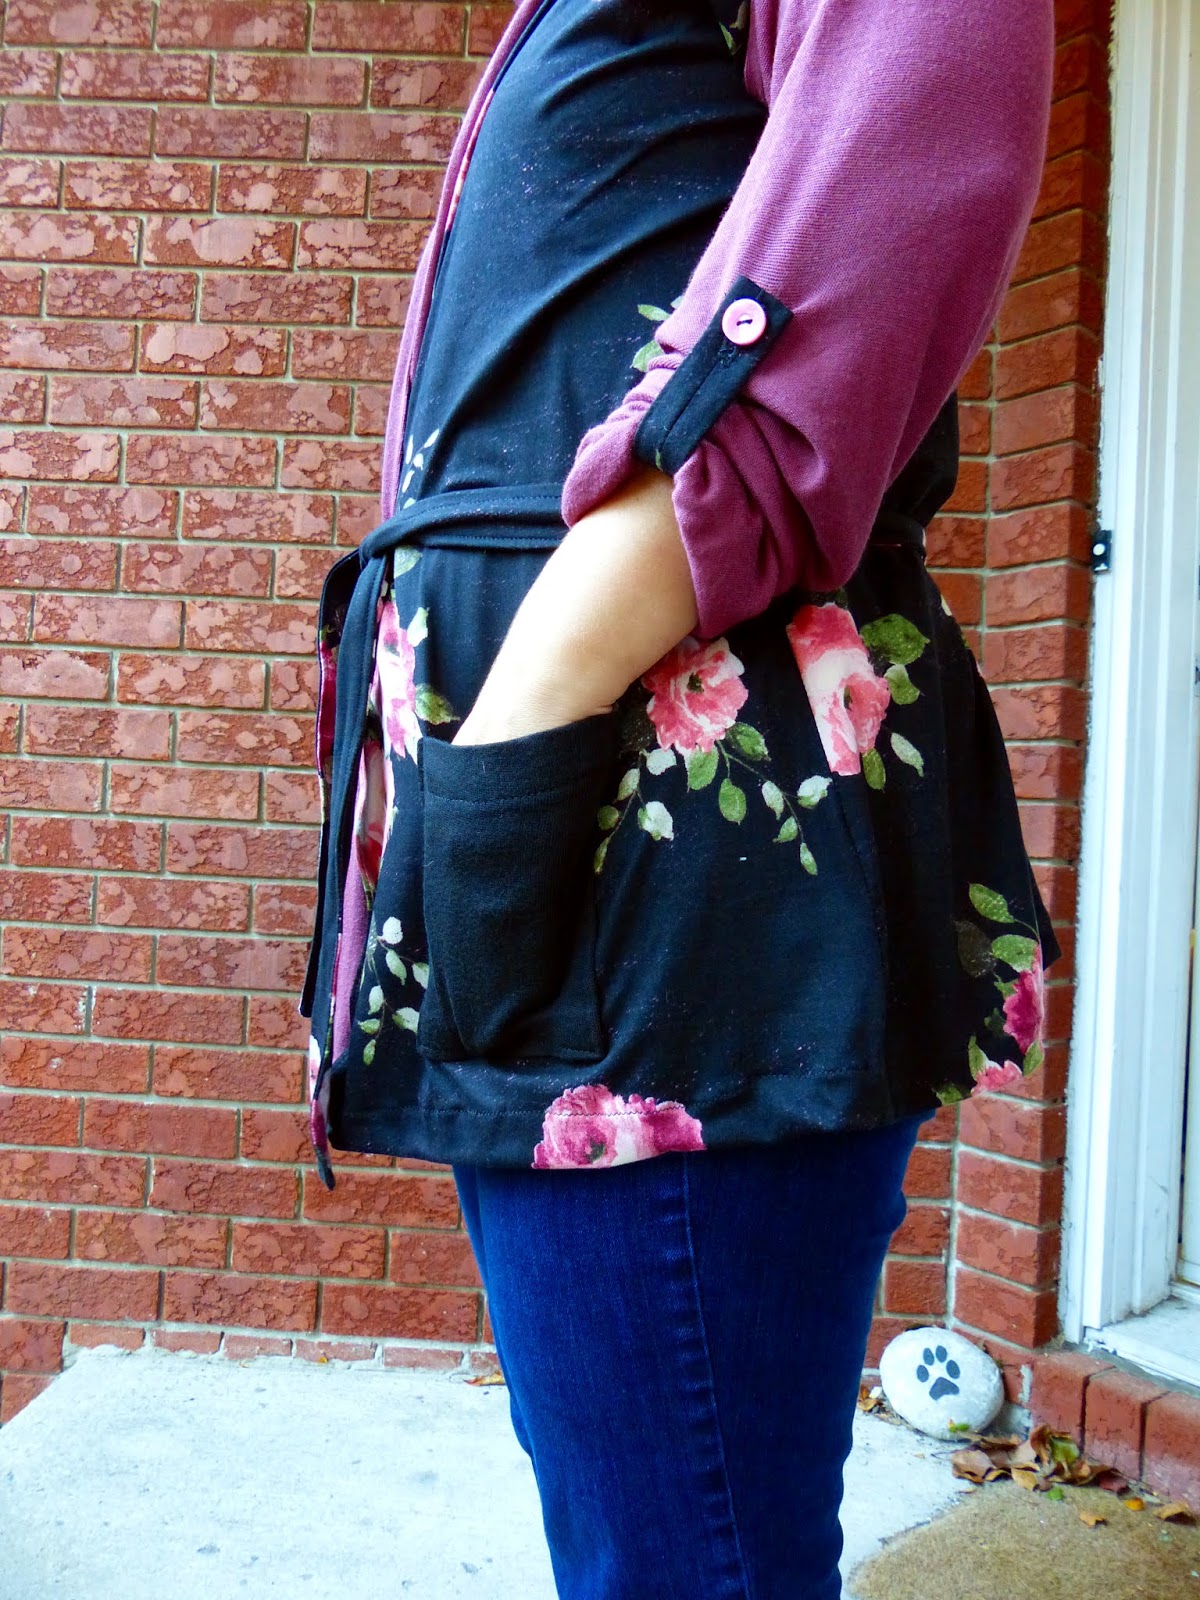
So I opted for some very light sweater knit for the sleeves, pockets, and band; and double brushed polyester for the floral pattern.

And you can also see the difference of the fit between belted and unbelted. I'm all about wrapping myself further into comfort! 

You could easily add buttons to the front, but this pattern doesn't include them. It's meant to be super casual.


The pockets are perfect - my hands fit in them without being at an odd angle, and I can keep love notes and lipbalms in them.

And Take note: I've paired my Eleanor with my Gloria Peplum top - because they seemed to go together like magic!


I also opted for the elbow cuff option - it was easier to do than anticipated - and a first time for me to sew this style in a pattern.

My arms I thought were regular length, but I may have cut the long arms, as they were quite long - you definitely want to elbow cuff if you are sewing the longer arm length.

The arms aren't too tight or loose, and feel good overall. You could easily  wear a light sweater underneath if it's really chilly outside.

Overall, the Eleanor is a lovely sew, and I can't wait until I can afford more fabric to try out the sexy duster length! 

Come on, LottoMax or Fairy Fabric Mother!

Sew On!


Thursday, 16 August 2018

How to Put on Jeans: Step 1 - Put on Laela Jeyne Taylor Leggings

Life with Chronic Migraines (and the inability to survive in areas with LED or Fluorescent lighting), I pretty much live in yoga pants and leggings these days as I work from home. 

I also work OUT at home, so being able to have 10 minute breaks for some yoga stretches when my muscles begin to stiffen up at my desk is important some days. 


He's right!  But I do admit a few years back I thought leggings as pants were evil. 

I made a compromise and decided that as long as I either a) had a tunic length top on, or b) am being active, that leggings ARE pants. 

But finding the best leggings pattern isn't always the easiest. 

Laela Jeyne just revamped their Taylor Leggings pattern, so I decided to give them a go. 

What does this pattern include?  
- 3 styles: plain one-piece leggings, 3 piece leg with pockets leggings, and 4 piece leg for colour blocking the mid panel
- Knee, cropped, or ankle length
- Contoured waistband with elastic at top for secure fit
- Optional maternity waistband
- Detailed fitting instructions


My first pair was knee length (I'm 5'-2"), and of COURSE has pockets!  

I used a mish mash of some of the last of the full pieces of spandex I collected last year, and they fit perfectly. 

The instructions were clear, there were no tears, and I am pretty sure I didn't put elastic in the waistband - I never do with leggings. 
Look at my Goddess pose above! 

The pockets are the white fabric on the side - perfect for my iPhone or keys! 


My second pair is made from a random piece of camo something spandexy I ordered from Okee Dokee Kids during a stash sale, and some dri-fit fabric for the sides.

Don't they make my behind look magical?  

They certainly can make the same magic with yours!  And they honestly aren't too tight, so I can both work in them, and do my Yin Yoga stretches in the without compressing my sore muscles.  

For me, If pants are too tight on the hips (even they they normally wouldn't be), I have troubles walking, and have a lot of pain, so looser is better these days.  


So if you want a pair of active yet comfy leggings, and don't mind a bit of colour blocking fun (hello, sew up those weird scraps!), this is definitely the pattern for you!


Sew On!


Friday, 1 June 2018

Swim Shorts, Say Ye? My 5 out of 4 Stella Shorts Hack!


I don't like Rompers...it reminds me of Romper Room or my mom's favourite neon pink one piece strapless romper from 1984.

No.

*BUT* I do like when pattern makers offer "Romper" patterns as separates - options are good.

When I saw the Stella Women's Romper Pattern release by 5 out of 4 Patterns, I was sucked into the vortex and within 10 minutes, I was printing out the instructions and pattern pieces.

Why?

Because it sold itself as not only a romper, but separates - including a bikini top! 

I need to update a few pieces in my outside attire this year, so why not add to my 90% 5oo4 Swim collection from last year?

And my favourite niece's name is Stella. And I like Stella Artois.


We were meant to be!

After ordering, I immediately asked (I really asked - on the Facebook Group) if I could make the shorts into swim shorts?

The answer was yes - and I even provided my measurements.  Jessica assured me that since the shorts are more relaxed fit, sizing down would be fine.

And you know what?  She was right!


After cutting through the last of my awesome blue squared swim fabric, and a bit of white spandex for the interior band, away I went! 

It took me a whopping half hour to whip up my Stella Swim Shorts - including pockets!

Things I did outside the pattern instructions:
- Sized down for swim bottoms


- Top Stitched the Pockets so they laid flat


- I had to piece together 3 pieces of the Blue square fabric width wise, and sewed a  middle seam to attach the Blue Square and White fabrics together to make the wider band


- In turn, I top stitched this seam, as it's where the inside and outside band are supposed to fold over in the instructions


I opted for the longer length shorts and hemmed the legs vs adding bands.

The shorts fit perfectly! Yay! 


Now I do find the band quite high, so I am able to push it down to give it a ruched look, but I'm going to just add Ruching (possibly ties like with the Reversible Riptides) next week when I'm back from camp.

I'll update once I've modified them a bit more, but was just so excited to share while Stella is still on sale!!  Check back next week for more waistband hacking!

I do have the top cut out to match, but haven't had the chance to sew it up yet, as I'm working on a testing for a NEW swim top for 5 out of 4, so priorities! 

For now, I'm sporting them with my Agility tank, also sewn from Swim fabric!

P.S. They also have a Girls Version, so sewing from baby to adult sizes is a reality!


Sew On!


Wednesday, 9 May 2018

Sewing Pattern Review - Mother Grimm's Beltaine Tunic

I absolutely adore Jodi from Mother Grimm Patterns - her designs are whimsy and unique. 

And she encourages my habit of colour blocking. 

The Beltaine Tunic is a diverse pattern, which even flatters those of us with hips!


There are a zillion options, so you can get away with wearing the same top over and over again. 

And it's the perfect length for those of us who insist on wearing leggings as pants (yes, I've been converted despite digging my heels in for years...pending the top is long enough to cover my caboose). 

The options included are:
- Round or Hanky Hem

- POCKETS

- Banded Bodice (great for colour blocking due to lack of full fabric!)

- Plain front (no colour blocking or pockets)

- Trim (lace, ribbon, or even DIY!)

- Colour Blocking


For my test muslin version, I used a REALLY thin sweater knit for the main portion, the last scraps of my Llama fabric for the pockets, and spandex for the band and pocket binding. 

The spandex was too thick (I feel), and I wouldn't use such a thin heavy sweater knit again (not flattering on my booty), but that's why we test with a variety of fabrics. 

So, I graded the pattern for my larger waist/hips from where I normally do on patterns - from between the armcycle and waist - which didn't turn out perfect - hence why we use scrappy fabrics for our first version during testing.

There were enough modifications made during testing, that the kinks were worked out, and it fits like a nice glove now!  


For my final version, I was *supposed* to do a plain version with ruffle, but needed to colour block due to a raging pounding migraine and lack of fabric. 

So I used the remainder of this black & white silky rayon fabric from when a local Fabricland closed 3 or 4 years ago, a lighter spandex for the band, and a super light sweater knit ($3 a metre Fabricland special) for the skirt and ruffle portion. 

I didn't have enough fabric for the full ruffle length (maybe 1 metre less), but I really like the drape it gives with a smaller ruffle. 

The ruffle isn't hemmed, so make sure to either use a fabric that doesn't get ratty over time and washes, or hem/zig zag stitch it to keep it pretty. 

I also didn't grade my final version either - I went straight Emerald sizing, with the smaller back option (to prevent sway back), and it's perfect! 

I'm 5'2" and didn't shorten the pattern anywhere, and with the right fabric (not slightly see through like my sweater knit), will make a cute flirty dress!  With leggings underneath, it's perfect legging length. 

It was a quick sew, and Jodi's instructions are clear and concise. 

If you like a little bit of flirty flare, sew for it!  

The Beltaine Tunic is on sale for 25% off with code BELTAINE25 under May 12th (Saturday) - Grab it now!


Saturday, 14 April 2018

Sewing Pattern Review: Rebecca Page Pippa Pants & Ultimate Patch Pocket Hack!


I love comfy pants. 

And pockets.

And ruching. 

And Rebecca Page Patterns. From the beginning of my "Sew-My-Wardrobe" adventures, I was drawn in by the Madison top, and then she took a chance on me when I applied for (and got into!) my first sewing pattern testing group!  

I've had the Pippa Pants pattern for a few months now, but had other projects and testing on the go.  But with cabin season coming up, and a lovely fleece lined Cotton Lycra sitting around for months from Water Tower Textiles , the Pippa pattern finally called out to me to just get'r done. 

Love the look of the Pippas!  

Front with 5 out of 4's Escapade Top!

Side view and the Circle Cardie!

Other side and Migraine face


But Pippa Pants lack what I love in me-made pants (because stores generally sew in fake pockets for ladies pants to tease them when they get home. Poor unused fake pockets).

*BUT* Rebecca Page also has the Ultimate Patch Pocket Pattern that I've used a few times to add pockets to existing clothing...so I figured I'd see how the Pippas fit before adding the pockets on. 

POCKETS!

First off, I'm 5'2", and the patterns are drafted for a 5'6" tall woman. I measured my inseam, and compared it to the pattern, deciding 4" off the length would be okay.  

Now I was a bit hesitant, as I have another pair of comfy pants made from similar fleece lined fabric, and I cut too much off the hem initially and have added two cuffs to it since, as the fabric does ride up over time.  I wanted to ensure the Pippas were a bit long to take the "sticking" factor of the fabric into consideration. They are about 1/4"-1/2" long, but for the sake of not looking like I hemmed my pants too short again, that's okay. I'm also a *LOT* more experienced at hemming and sewing with knits now vs last spring when I sewed my other pair of (I have no idea what pattern) comfy pants. 

So once the length was decided, the pattern happily ran the length of the fabric wonderfully - I was able to use my 1 meter of fabric and have some left over for some more Winter Wear Designs Alpine Fingerless gloves - a necessity in life since I lost finger circulation. And maybe a pair of comfy socks too. I can do a *LOT* with a meter of fabric!  

The ease of instructions made the Pippa pants a quick sew - and in about an hour and a half, my Pippas were complete.

I opted for:
- Full Length
- Ruched Side Ties
- My "Hack" of adding the Classic Patch Pocket 

The Ruching is awesome for anyone looking for this style of pants, but really just wants to be comfortable and feel awesome without feeling self conscious about their mid section. 

Look at the Ruching and POCKET!

I feel the flat front is best for anyone who has less confidence issues about their mid-section. 

That's why we sew, right? To make clothes that make us feel our most beautiful and confidant.  Clothes that fit properly. And really, it's a great stress reliever and way to be creative. 

And the pockets. 

I put on my finished pants, and pinned the pockets where I felt they looked best.  

The top side I matched up with the bottom of the band seam, and it is 1.5" away from the centre seam on either side. 

I sewed the pocket on in two steps - the side section (furthest away from the centre), and then from the top (and the band seam), and 90 degrees angle turn to finish off the curved edge down and towards the side section.  

Make sure to use a lot of pins, and hold the fabric tight (but not TOO tight) while pinning to ensure it sews on smoothly.  Sew slowly to avoid any weirdness in the fabric (pocket or pants), and voila!  

Instant pockets!  

Next pair I may put back pockets too, but I do think that my behind does look rather nice in the Pippa Pants...so I'll ask Husband's opinion about that first.  He REALLY loves the Pippa look on me. 

And for me, I have lunge and squat thighs, so finding a pair of loose but not-too-loose pant patterns isn't always easy. I either look like I'm floating in big pants, or like I have sausage legs. But the Pippa Pants fit my thighs perfectly - I can see many more in my future.  

Yay flattering for my Booty!

And with the right fabric, as I did with my Bella Sunshine Designs Sansa Pants , I'll be wearing my Pippas to the office whenever I am well enough to work in the brightly lit office environment again. Until then, Pippas and I will work from my home office in style.  

Because one should always dress stylish but comfortable for a productive day at the office!  

And all April the Pippa Pants are on sale - they come in Ladies, Girls, or a Bundle Package (Ladies, Girls, AND cute doll version).