Monday 30 April 2018

Sewing Pattern Review: Twig + Tale Forester Coat

Twig + Tales patterns are full of Whimsy and Magic.

I fell in love this fall with their Pathfinder Vest with Animal Upgrade (because what 30 something year old doesn't want to have a funky animal inspired vest for running around the forest in??).

I was fortunate to be part of the background testing for their newest pattern - the Forester Coat - for Women, Men, and even babies with a Nestledown option.

Twig + Tale loves upcycling - and this jacket is perfect for old warm blankets that you have too many of, and is also a great scrapbuster for fabric that doesn't have large enough pieces to make a more traditional or basic coat.
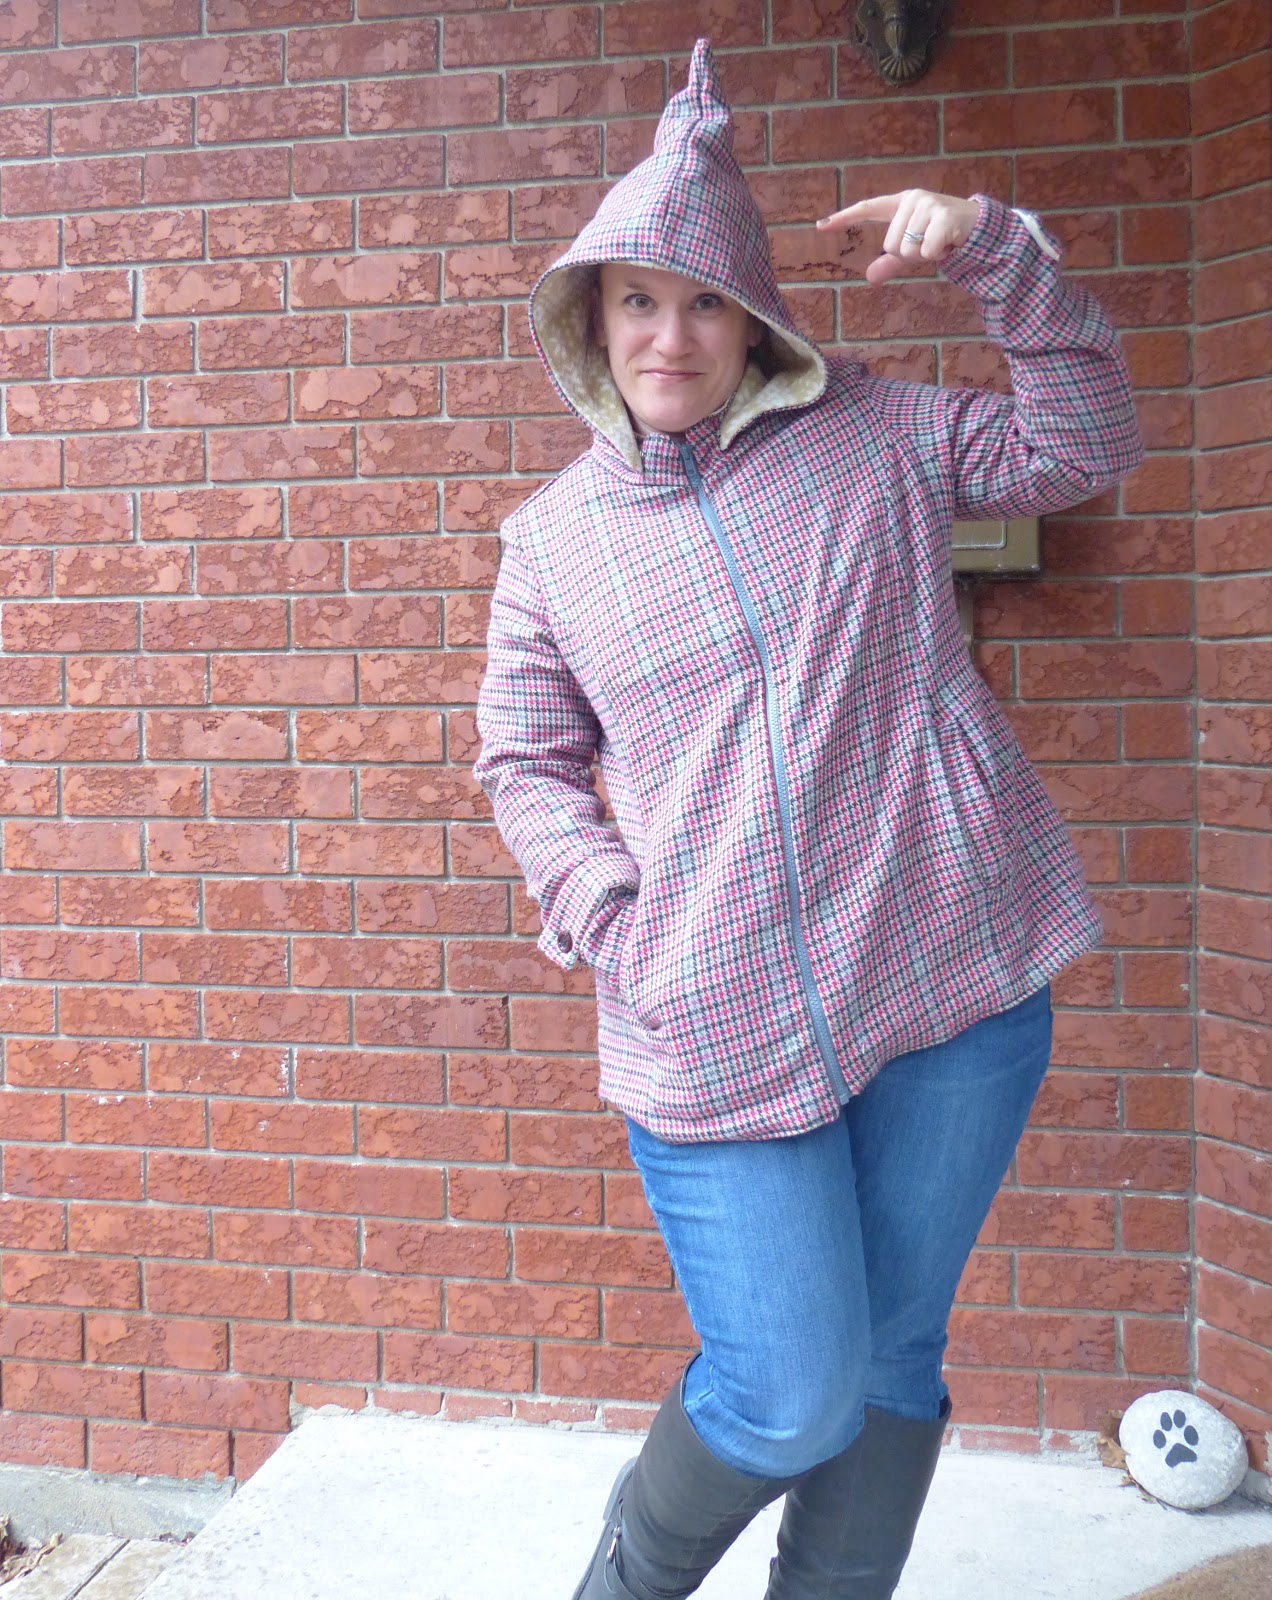
Pixie Hood Version
Round Hood Version


There *are* a lot of pattern pieces, but that's part of the magic - the design is meant to loosley hug your curves in all the right spaces, with enough room for a sweater underneath in the fall or winter, and breathable enough on those cold spring or summer dewy morning.

And really, the instructions are stellar - and include video instruction for those of us who are more visual.

It leads to a coat that looks store bought made with your own chosen fabrics!

I made two versions, and each version has a different hood - typical Round hood AND a Pixie hood for when I'm feeling mischevious!

I didn't have to use my seam ripper during the production of either coat, so that means the instructions REALLY are user friendly, as I typically do one rip on longer sewing projects, as I try to get them done in one sew.


My Round Hood version is made from fleece for the exterior, and a mix of some scrappy thick satiny fabric and flanelette unicorn fabric. 

Because UNICORNS!

I added the outside pockets and back belt to this version.

The hood is held on with snaps, so doesn't always have to be attached. I like the side blinders and hood coverage it gives me on car rides so I can close my eyes and the drive doesn't bug my Migraine as much (the side visuals are too fast for me right now).


INSIDE POCKETS!

The second is made from coat fabric I got for $4 a metre for another coat project that I ended up using a different fabric for. I knew as soon as I saw the Forester pattern testing come up that it was meant to be! 

Inside I used a few different silky linings and some of the leftover fleece from my round hooded version, as I didn't have enough one one lining fabric for the entire inside, but that's ok, as it's the inside, and they're complimentary colours!

I added both inside AND outside pockets, because one can never have too many pockets. And it has the back belt and sleeve tabs as well.

I'm 5'2", and both coats cover my caboose, which is great, as that area tends to get cold quickly.

I can wear a fleecy underneath, and am very tempted to make another Pathfinder Animal vest to go on underneath  and remove my removable hood on the occasions I pair both coat and vest together.

Actually....I could probably just hack an animal hood ONTO it - OMG - epiphany moment!  I'm totally doing that after work today!

 I can never be warm enough these days, so layering is extremely important.

Overall, the Forester Coat pattern is relatively easy despite the number of pattern pieces - challenge yourself and make yourself the perfect fitting coat today!  You'll be proud of yourself and look fabulous with the end results! 

Join the Twig + Tale Facebook group for any questions or to be inspired by others Forester coats (and beyond) - you'll love the whimsical feeling it will give you!


Thursday 19 April 2018

Sewing Pattern Review: Bella Sunshine Designs Emmaline Top and Dress

I love colour blocking (aka using as much of my different fabrics in as many clothing articles as possible).

Bella Sunshine Designs Emmaline instantly drew me in with the awesome Chevron Skirt!


I have sewn up both a dress and a top, and can't wait to hack the top version with Chevrons as well!  Why? Because it's fun, a challenge, and because it's a test of skill.


The Emmaline pattern has a multitude of options, including:

- An unlined bodice\
- Banded flattering neckline
- Full Bust Adjustment pattern pieces if you upper and full bust have more than a 3" difference
- 2 A-line skirt options - simple (plain) or Chevron
- Top, Dress, or Maxi dress lengths
- From girls to ladies sizing

For the Ladies sizing, it goes:

- Up to 59.75" overbust
- Up to 53.5" Waist
- Up to 59.75 Hips
- Up to 22.6" Bicep (Melissa has awesome directions if you require a larger bicep adjustment)

The bodice is knit (4 way stretch) - a more stable cotton lycra is preferred to avoid sagging with the skirt weight.


Same pattern - different looks!


The skirt can be any knit fabric with good draping - the drapier, the more whimsical the skirt is!

It's about an hour or two from cutting to finished, depending on which style you take on.

The instructions are clear, and walk you through each step with drawings and easy to understand verbiage.

If you are so inclined, try mashing Emmaline up with the Clementine, Amelia, or Sahara skirts or bodices for a different look! 

Grab your Emmaline now and Sew On!


Tuesday 17 April 2018

Sewing Pattern Review: Rebecca Page Meghan Wrap Dress

Rebecca Page Patterns has done it again - another lovely design that's a bit different from the others!

The Meghan Wrap Dress can be as casual or dressy as you like! 


The pattern design includes:
- 3 lengths - slim knee length, midi flared length, or maxi super full length

- Crossed bodice

- Sleeveless, Short, 3/4 length, or Long Sleeve Lengths


It comes out and was named for Meghan Markle - the newest member of the Royal Family! 

And *I* suggested the name first, so am totally taking credit for that :)  I think she's a stunning fashionable woman, and the Meghan Dress reflects her style in every way.

The front facing for lighter fabrics is best completed with interfacing inside the bodice facing, and make sure to measure your torso for the best bodice fit and coverage.

The sleeves aren't too tight, and the skirt bottom is quite flattering in both my mid section and behind, which I was a bit concerned about when choosing the fabric I did (it tends to show lumps and bumps). But the Meghan is flattering on me and the other ladies who tested - we give it a Royal Wave! 


I can't wait to hack into this and make a tunic lengthed version! 

Sew On!


Sewing Pattern Review: Winter Wear Designs Outer Banks Boat Neck Tee and Tunic

I've wanted to pattern test for Suzanne from Winter Wear Designs for eons now, and finally had the opportunity to quickly sew up the long sleeved version of the newly released Outer Banks Boat Neck Tee and Tunic


I responded to a request Wednesday morning, and by mid afternoon te sameday, I had the top sewed up with proper photographs for a last minute pattern addition! 

So not a true pattern test, it let me email back and forth qith Suzanne, and she seems quite friendly and down to earth - like her Winter Wear Designs patterns.

It's a semi-loose fit knit top that offers several options:
- Boat neck with 3 different finishes - Suzanne will guide you through to get you the perfect flat fit!

- Sleeves: short, 3/4, long, or 3/4 length bishop sleeves (so pretty!)

- Top or tunic length (with RUCHING option!)

It's a great Wardrobe builder top, and can be as fancy or casual as your fabric allows. 

I opted for a medium weight C/L trailer pattern and lightweight C/L Royal Blue for the perfect mashup.


I love the ruching, and it is always my go to (along with pockets, hoods, and thumbhole cuffs), hence why the pattern instantly grabbed my attention.


The boatneck instructions were detailed for all levels of sewing, and led to a flat lay and an awesome new neckline sewing skill checked off on my skills list.

And for $5, you can't really go wrong with this pattern


I look forward to adding some thumbhole cuffs and doing a bit more colour blocking to sew up some of my odd width fabric scraps to my next boatneck tops!

Sew On!


Saturday 14 April 2018

Sewing Pattern Review: Rebecca Page Pippa Pants & Ultimate Patch Pocket Hack!


I love comfy pants. 

And pockets.

And ruching. 

And Rebecca Page Patterns. From the beginning of my "Sew-My-Wardrobe" adventures, I was drawn in by the Madison top, and then she took a chance on me when I applied for (and got into!) my first sewing pattern testing group!  

I've had the Pippa Pants pattern for a few months now, but had other projects and testing on the go.  But with cabin season coming up, and a lovely fleece lined Cotton Lycra sitting around for months from Water Tower Textiles , the Pippa pattern finally called out to me to just get'r done. 

Love the look of the Pippas!  

Front with 5 out of 4's Escapade Top!

Side view and the Circle Cardie!

Other side and Migraine face


But Pippa Pants lack what I love in me-made pants (because stores generally sew in fake pockets for ladies pants to tease them when they get home. Poor unused fake pockets).

*BUT* Rebecca Page also has the Ultimate Patch Pocket Pattern that I've used a few times to add pockets to existing clothing...so I figured I'd see how the Pippas fit before adding the pockets on. 

POCKETS!

First off, I'm 5'2", and the patterns are drafted for a 5'6" tall woman. I measured my inseam, and compared it to the pattern, deciding 4" off the length would be okay.  

Now I was a bit hesitant, as I have another pair of comfy pants made from similar fleece lined fabric, and I cut too much off the hem initially and have added two cuffs to it since, as the fabric does ride up over time.  I wanted to ensure the Pippas were a bit long to take the "sticking" factor of the fabric into consideration. They are about 1/4"-1/2" long, but for the sake of not looking like I hemmed my pants too short again, that's okay. I'm also a *LOT* more experienced at hemming and sewing with knits now vs last spring when I sewed my other pair of (I have no idea what pattern) comfy pants. 

So once the length was decided, the pattern happily ran the length of the fabric wonderfully - I was able to use my 1 meter of fabric and have some left over for some more Winter Wear Designs Alpine Fingerless gloves - a necessity in life since I lost finger circulation. And maybe a pair of comfy socks too. I can do a *LOT* with a meter of fabric!  

The ease of instructions made the Pippa pants a quick sew - and in about an hour and a half, my Pippas were complete.

I opted for:
- Full Length
- Ruched Side Ties
- My "Hack" of adding the Classic Patch Pocket 

The Ruching is awesome for anyone looking for this style of pants, but really just wants to be comfortable and feel awesome without feeling self conscious about their mid section. 

Look at the Ruching and POCKET!

I feel the flat front is best for anyone who has less confidence issues about their mid-section. 

That's why we sew, right? To make clothes that make us feel our most beautiful and confidant.  Clothes that fit properly. And really, it's a great stress reliever and way to be creative. 

And the pockets. 

I put on my finished pants, and pinned the pockets where I felt they looked best.  

The top side I matched up with the bottom of the band seam, and it is 1.5" away from the centre seam on either side. 

I sewed the pocket on in two steps - the side section (furthest away from the centre), and then from the top (and the band seam), and 90 degrees angle turn to finish off the curved edge down and towards the side section.  

Make sure to use a lot of pins, and hold the fabric tight (but not TOO tight) while pinning to ensure it sews on smoothly.  Sew slowly to avoid any weirdness in the fabric (pocket or pants), and voila!  

Instant pockets!  

Next pair I may put back pockets too, but I do think that my behind does look rather nice in the Pippa Pants...so I'll ask Husband's opinion about that first.  He REALLY loves the Pippa look on me. 

And for me, I have lunge and squat thighs, so finding a pair of loose but not-too-loose pant patterns isn't always easy. I either look like I'm floating in big pants, or like I have sausage legs. But the Pippa Pants fit my thighs perfectly - I can see many more in my future.  

Yay flattering for my Booty!

And with the right fabric, as I did with my Bella Sunshine Designs Sansa Pants , I'll be wearing my Pippas to the office whenever I am well enough to work in the brightly lit office environment again. Until then, Pippas and I will work from my home office in style.  

Because one should always dress stylish but comfortable for a productive day at the office!  

And all April the Pippa Pants are on sale - they come in Ladies, Girls, or a Bundle Package (Ladies, Girls, AND cute doll version). 


Wednesday 11 April 2018

Pattern Hack: Mamma Can Do It - Men's Fit Pants

Occasionally, I must sew for someone else, and that preferred person is Husband. 

He is EXTREMELY picky with clothing, and like me, not a cookie cutter straight fit, so after a few failed attempts last year, I finally found a few patterns that worked with him (with the sizing guidance of the pattern designers and groups).

I had the opportunity recently to test the new Men's Fit Pants and Shorts pattern for Mamma Can Do It, and Husband was happy I was sewing yet again for him. 

I lacked Husband's presence during the muslin version (aka he was snoring in bed), so didn't have the right elastic measurement other than his waist size, which isn't where the pants sit on him - they sit on his lower abdomen, so I safety pinned him in for fit pictures while my head wasn't Migraine Spinning too badly. 

I ended up taking a pair of sleep shorts I made him for Christmas, added a few more inches as they were a BIT snug (things happen when you make clothes in secret for a surprise - don't use tight Jeans as a size guideline - ha ha), and got the perfect elastic fit for the final pair of shorts.  

Pockets and look at that Elastic - fits perfectly without being tight! 


I did place the fake fly on the Version 1 of the test pattern, and although it was widened slightly for the final version, he still felt the reprint was too thin, so I left it off his final shorts. 

I have sewn fake flies in 3-4 other patterns previously, and honestly found these instructions the easiest to follow - especially with my current brain fog and slow brain state - so you'll be pleased at the ease of adding the fly if you opt for that selection.  

Similar to Zippers, sewing flies - fake or real - is not an easy sewing instruction to explain, and I've had to watch videos in the past to get it.  These instructions differ from others, and I got it first time without hesitation. 

I didn't have to lengthen the shorts or alter beyond the straight sizing I made (size 46 as per measurements guideline included in the pattern instructions).  And he's 6'-2", so this gives you an idea of where the normal shorts sit.  And he has had to have shorts lengthened 2-3" with other patterns to hit his knees as they do with this pattern, so it was nice to not have to alter anything on the pattern. 


Front
Back - Look at those seams!  I'm getting good!


Then on day 5 (6?) of non-stop migraine head pounding, I was saddened to find out that the custom fabric I'd been coveting for almost a year for him wasn't quite enough to cut the entire shorts out of. 

I wasn't leaving the house to hope that I could find any decent fabric at the closest knit fabric store a 30-40 minutes drive from home in traffic on the weekend (or weekday in the full Migraine zone). 

So I did what I do for myself normally. I found a nice basic complimentary cotton lycra fabric,  and colour blocked. 


Front is one fabric type...


From the side, you can see the grey fabric - vertical - and the nice flat pockets! 

But what makes this pattern awkward to colour block (but gives the shorts/pants their flattering shape), is the curve in the actual pattern piece. 

So I measured across the back piece - 12.25" at the leg - and marked the pattern centre from top to bottom, and literally cut the pattern piece in half vertically.

I cut two mirror imaged pieces from the custom fabric, and the other half from the normal cotton lycra (light grey in my case) - ensuring there was a 3/8" seam allowance extra on either side to allow me to sew them together in the centre. 

So with my stretch stitch, I placed one full set of the back panels right sides together (one custom and one grey piece) - ensuring they matched the full pattern piece before sewing (because seam ripping a stretch stitch isn't fun!). 

I pressed the seam flat, pinned each side of the seam with dressmakers pins, flipped over the full back piece, and top stitched on either side of the seam, creating not only a flat seam, but giving the seam a professional look. 

From that point onwards, I was able to sew up Husband's new shorts with side and front pocket options and a Regular fit.

He likes his behind in it, and gave a little wiggle - asking Husband's to pose for pattern test photos either entails silliness or grumpiness on his end.


He just started wiggling...so I couldn't resist - is THIS what Husbands think we do during pattern photo shoots??


He is EXTREMELY picky with shorts/pants, and blames what his mother gave him for slight bulkiness in the front area, but this is a normal complaint he has - we're still keeping together shorts that should of gone away a long time ago, but he can't find replacements he likes.  

So I'll attempt these again in perhaps a medium thickness stretch cargo pants style fabric (if that exists!), with the fake fly widened, in the Wide leg style to see if that gives him the room he wants. He will also prefer the wider leg option that the Wide Leg style offers, as he is a baggy clothes style guy. 

So overall, Husband has worn his shorts 3 days in a row (I'm sneaking them into the wash today!), and loves them as lounging shorts.

The other testers have great "serious" pants and shorts and everyone did a great job making their Husbands and mates a bit happier - sewing for all of those people we love! 

And the other husbands are just as silly as mine - maybe it goes with the sewing wife territory?  One man also did a wiggle, another posed like he was a super model, then there was tractor farm guy (I NEED that fabric for Husband's next pair!), and my friend An - oh An.  

An's the European version of me. One day I *will* go to Europe, visit Husband's family in England, go back to the Black Forest region of Germany (and see that famous castle I was kyboshed on in lieu of the Mercedes Benz Museum - which was cool....but I didn't see any "real to me" castles), and spend a week with my friend An, her puppy, and her Husband who seems just as silly as mine. He did a twirl video - I'm so proud of him!  

We have to keep a tally of how many people we get to twirl in tests now - it's our way of spreading sparkle and joy in the sewing world even when we're not 100% our best. 

Or An can come to Canada and we'll float down the Riviere Noire in Unicorns at our camp - a 10km river float that lasts 4 hours until you get beached at the area we park our ATV.


I really do float down the river in a Unicorn!  


Our men can do camp stuff, twirl, and wiggle in their Mamma Can Do It's Men Fit Pants while we're busy floating. 

Sew on and don't be afraid to use this hack for other patterns - it's a great use of fabric, and after the first few times you do it, it's just second nature and looks really quite amazing!  Take your time, and make your man some bottoms!