Showing posts with label #sewingmywardrobe. Show all posts

Tuesday, 6 November 2018

Dressing With Elegance - 5 out of 4 Patterns Mabel Ruffle Cowl Tunic

Fashion is the armor to survive the reality of every day life. 

That just about sums up my life. 

Sewing is my lifeline to fun, playfulness, and total utter creativity. 

It also makes me go outside of my comfort zone as far as fashion is concerned.


Ruffles? Me? Never...wait...Mabel changed my mind on that one. 

I created two  5 out of 4's Mabel Ruffle Cowl Tunic - each with a bit of adjustment or hack for the right fit. 

There are several options for this top:
- Regular or tunic length
- Short, 3/4, or full length sleeves
- Cowl or regular neckband
- Ruffled skirt bottom or plain skirted bottom

Mabel #1

I found My first Mabel to be a bit too roomy for my liking - the intent of the pattern *is* to have a bit more room in it - but this wasn't my style, but with assistance from Jessica (5 out of 4's Owner), I Graded Small on the entire front bodice, and graded from small to medium on the back piece to accommodate for my Caboose - and it worked!

I went from swayback to Sexy Back in a snap. 


Okay..in the time it took for me to rip out my stretch seam from both sides and the ruffle at the seams, cut the front bodice to the small sizing only, resew the side seams, and reruffle and sew the ruffle again. 

Left pictures = Before Alteration

Right pictures = After Alteration


I do have issues lately due to Chronic Vestibular Migraine Brain. The easiest tasks take me at least twice as long as normal. 

But sewing gives me the greatest joy, so I persevere. 


Look at that Sexy back!

I love the flow of the ruffle - fun in light
Feminine yet sassy

I really like the length of the sleeves (a bit long so I can totally cover my hands when they get cold), and the drop of the ruffle at the back. 

It doesn't make me feel hippier, and the cowl is SO comfy.  With Winter Coming, covering my neck is a must. 

The cowl was super simple to make, and doesn't bunch up a lot, so it's not suffocating for those who have anti-neck touching issues. 


My fabric is a lovely Rayon Spandex from Water Tower Textiles. It's so soft - and at the same time, it's not clingy. It had some "discolouration" on the roll, so I got it for a steal. The same with the Wine coloured light sweater knit - also from Water Tower Textiles - I've used this in so many different clothing items. I only needed a scrap of it for the cowl inside, and I used the floral for the exterior portion of the cowl. 

I try to be $$ smart with fabric, as my funds towards it are quite limited. If I could get more, I totally would! 

Me thinking about more fabric

Mabel #2

My second Mabel isn't Promo Approved, but I love the slimmer fit. 

I just went straight Small and took 1" off the shorten/lengthen line, and voila. 


The only unfortunate part (that probably only a sewist would notice) is the back at the high hip takes a bit of bunching on - that's easily fixed with the Mabel #1 alteration of grading to medium at the hips. It would then lay flat. 


I paired the Eleanor Cardigan with this Mabel - see the matching Wine coloured sweater knit

I also went purely Water Tower Textiles with this version, pairing the Rayon floral pattern with a comfy lightweight cotton lycra pink and ivory striped fabric. 

I also went with the regular band vs cowl on this version - I think it looks good either way, and makes it versatile for all seasons. 


Glasses to help my brain connect with my eyes properly - Husband finds them ultimately sexy, so this is apparently my favourite pose for him now. *sigh* MEN!


So you can alter the Mabel pattern to truly accentuate your body in a positive way. Even the ladies testing with me who weren't sure about ruffles were converted to the Ruffle Side. 


***Affiliate Links Above used - I love these patterns, and without the help of those who love their patterns, marketing would be extremely difficult for the pattern makers we love and learn to love. Affiliate links help with the hours, fabric, and tears that go behind testing each pattern in order to provide a real-person view on the patterns for you (and me!) 

Sunday, 9 September 2018

Whatever Lola Wants, Lola Gets!

Lola wants to help your legs look like they go on for days, without taking away the comfort factor. 

5 out of 4's Lola Shorts, Capris, and Pants Pattern will make your behind dazzle, and can be created with a multitude of fabrics.

She includes:
- Lightweight and Drapey Knit OR Woven fabric options
- Shorts, Capris, or Pants lengths
- Optional Belt Loops and Waist Tie Belt
- Optional Pockets

I opted for ALL THE OPTIONS. Especially pockets. You can never go wrong with pockets. 

My first Lolas are the Capris version


Created with flowy silky fabric (think silky pyjamas), I can get away with wearing these Lolas out for a night on the town, or lounging on the couch snuggling up to Husband (actually, more likely a dog who refuses to move from the couch).


I think they make my behind look nice. 

They'll make your behind look nice too! 

AND they have POCKETS! So you can put your hands, spare change, or your phone in a pocket for safe keeping.


They were a quick sew, and have a paperbag-effect waistband, leaving you wondering where the  zipper is. 


Fact: No zippers have been involved with Lola.

She's all about comfort and fashion! 


My second pair is shorts from random suiting fabric given to me by my Mother-in-law's sister when she moved in the Spring.  The fabric flows, and these are the perfect office to after-work drinks shorts! 


I paired both pants with my Stella Top - which happens to have stretch lace straps instead of fabric straps. Making this Stella comfy and a bit sultry!

Overall, with the belt and pocket options, these bottoms are a must have for all seasons.

Can you imagine nice stretch velvet flowy pants for your staff Christmas Party? Or Silky pants for that Cruise you're going on in the Winter season? 

Oh yes - I went there! 

Grab Lola now before she runs away!

Saturday, 12 May 2018

Sewing Pattern Review: The Wolf and the Tree's Ballerina Tie Top and matching Ballerina Skirt

The Wolf and the Tree is a lesser known designer, but I enjoy sewing her whimsy designs - and they are easy to follow instructions with minimal confusion on my end. 

I get brain fog and can forget what I'm doing mid-sew, so easy instructions are important. 

Two of her designs are Ballerina themed. I mean what woman in her 30s wouldn't want to feel like a slender, graceful ballerina?


This skirt has an assortment of options:

- Regular or Deep Scoop Back

- Two widths (regular or extra full)

- 4 lengths - Accent, Short, Medium, or Long

- 4 Tiers - choose from 1 to 4 layers of skirt!

- Knit Waist Band

- Woven or Knit Skirt depending on the look you are going for

I made 2 versions, and they are so reminiscent of Cosplay and fun - but you can sew a single later for an everyday skirt as well.

Now, there *is* a LOT of gathering - I found sewing gathering lines on the front and separate gathering lines on the back made the gathering process SO much easier!  Do sew 2-3 lines of gathering stitches in case you break one of the threads while gathering - at least then you have a back up gathering line. 

The hemming didn't do the normal weirdness at the bottom (you know - when it flips and gathers while hemming) - but I ironed the hems first THEN sewed.  

This makes ALL the difference in a flat rounded hem!  

The more layers you have, the more hemming and gathering, but other than the time required for that, it's a relatively easy sew. 

They even have a Girls version, so you can match the little ones if they get jealous of your masterpiece!


For my first skirt, I used random flowy (maybe used for business pants?) maroon fabric over top of a double layer of light flowy cotton and lining fabric for the second skirt layer

The double second layer was to give the skirt a bit of a boost!  

The Waist band is spandex, and therefore, the skirt is easy to get on and off. 

I call it my sassy Bardess skirt - it's fun and flirty - and I can wear it on a normal day as well when I'm in a feisty fun mood!  


My Crazy Testing Photo Face

For my second skirt, I opted for some stretch velvet sparkly Meow Fabric for the second and fourth layers.  For my second and first layers, I used an old sheer Ikea Curtain. 

Again, I sewed a double second layer (if I recall, I meant to have 4 tiers, but something happened with the 3rd layering fabric!).

It works well, and is totally Cosplay - perfect for the upcoming Comicon season, and SO much easier than sewing a bustle, giving a nice Steampunk appearance.

It's very twirlable without showing what's underneath. 


I LOVE the tie top - I forgot how much fun it is until I wore one last week for May the 4th (Star Wars fabric, HELLO!), and sewed a tank top version of it this week. 


Its options include: 

- Regular or Cowl neckband

- Sleeveless, Short, 3/4, or Long length sleeves

- A nice Tunic length top - falls below my 5'-2" hips, which I prefer

- Ladies sizes UP TO  49.5" hip, 39.5" Waist, and 47.5" bust - so a great variety for a plethora of body shapes

Sewing it up - honestly, super easy. If you can sew a t-shirt, you can sew this - the only extra steps are the ties, which can be single or double sided. 

Really - THAT easy. 

I've sewn 3 so far - it's love. 


My First is made out of a light sweater knit fabric with a black lace tie. 

I can get away with wearing this at work with a nice blazer or cardigan - it's one of my "plainest" tops in my closet. 


My second just rocks. 

I used a medium sweater knit for the front and bands (stars), and Floral Wars Star Wars Cotton Lycra Fabric for the back.

The tie is the same black sweater knit from my plain black version. 

I like the light tie, as it wraps well, and doesn't have much bulk - it's easy and comfy to sit in. 


And my most recent version just - LOVE!

I used light cotton lycra for the front, and a cotton lycra Tardis print for the back - both fabrics were used for the tie. 

The fabrics are thicker as the tie, so not quite as comfy to sit in (so I just undo the tie while sitting), but SO worth the effect! 

The tie is very flattering for my abdomen, and covers up some lumps and bumps - it's a great alternative to ruching.

I love that this top is so different, and I get compliments on them whenever I wear them. 

I'd highly recommend this for every day wear - it's just a different form of elegance and sass combined in one pattern. 

Sew On!

***Affiliate Links Above used - I love these patterns, and without the help of those who love their patterns, marketing would be extremely difficult for the pattern makers we love and learn to love. Affiliate links help with the hours, fabric, and tears that go behind testing each pattern in order to provide a real-person view on the patterns for you (and me!) 

Wednesday, 2 May 2018

Sewing Pattern Review: Rebecca Page's Berry Bubble Shorts


(PSST! Use code MAYPP20 for 20% off Berry Bubbles throughout May 2018!!)


I have knees that burn like watermelons in the sun.


My knee vs Watermelon 10 years ago...they've been super burnable since!

So having knee coverage and NOT short-shorts is a must.

I've been coveting Rebecca Page's Berry Bubble Shorts for some time, and caved in, grabbing the Add-On so I could make longer unlined shorts - they even hit my knees! 

I did a little dance once they were done.


Sewing timewise, they were a slow sew, but with all the details and end result - totally worth spending a few evenings on!

I used random Walmart cotton for the main portion of the shorts, and scraps of other cotton for the pockets.

I made my own binding as per Rebecca's online tutorial, and it was much easier than I anticipated - and great way to use more weird scraps of fabric.

The original Berry Bubble Shorts Pattern includes:
- Fully Lined Shorts
- Short, Mid Thigh, and Knee Length Options
- Leg Binding or Cuffs
- Straight or Bubble Leg Finish (great for all figures.
- Buttons at the front
- Bias edged pockets
- pretty pleats

I opted for the Mid Thigh length with cuffs and straight leg finish for mine from this portion of the pattern.

The Berry Unlined Pants Pattern Add-On includes:
- Unlined option
- Capris and ful length pants options!
- You require the original pattern to complete your pants or unlined shorts, or can grab the Bundle with the Ladies, Girls, AND Doll patterns (all the Berries!)


They aren't too wide legged, and I really like the fit and comfort level.

They are my new summer-must have - ALL THE BUBBLES!


Monday, 30 April 2018

Sewing Pattern Review: Twig + Tale Forester Coat

Twig + Tales patterns are full of Whimsy and Magic.

I fell in love this fall with their Pathfinder Vest with Animal Upgrade (because what 30 something year old doesn't want to have a funky animal inspired vest for running around the forest in??).

I was fortunate to be part of the background testing for their newest pattern - the Forester Coat - for Women, Men, and even babies with a Nestledown option.

Twig + Tale loves upcycling - and this jacket is perfect for old warm blankets that you have too many of, and is also a great scrapbuster for fabric that doesn't have large enough pieces to make a more traditional or basic coat.

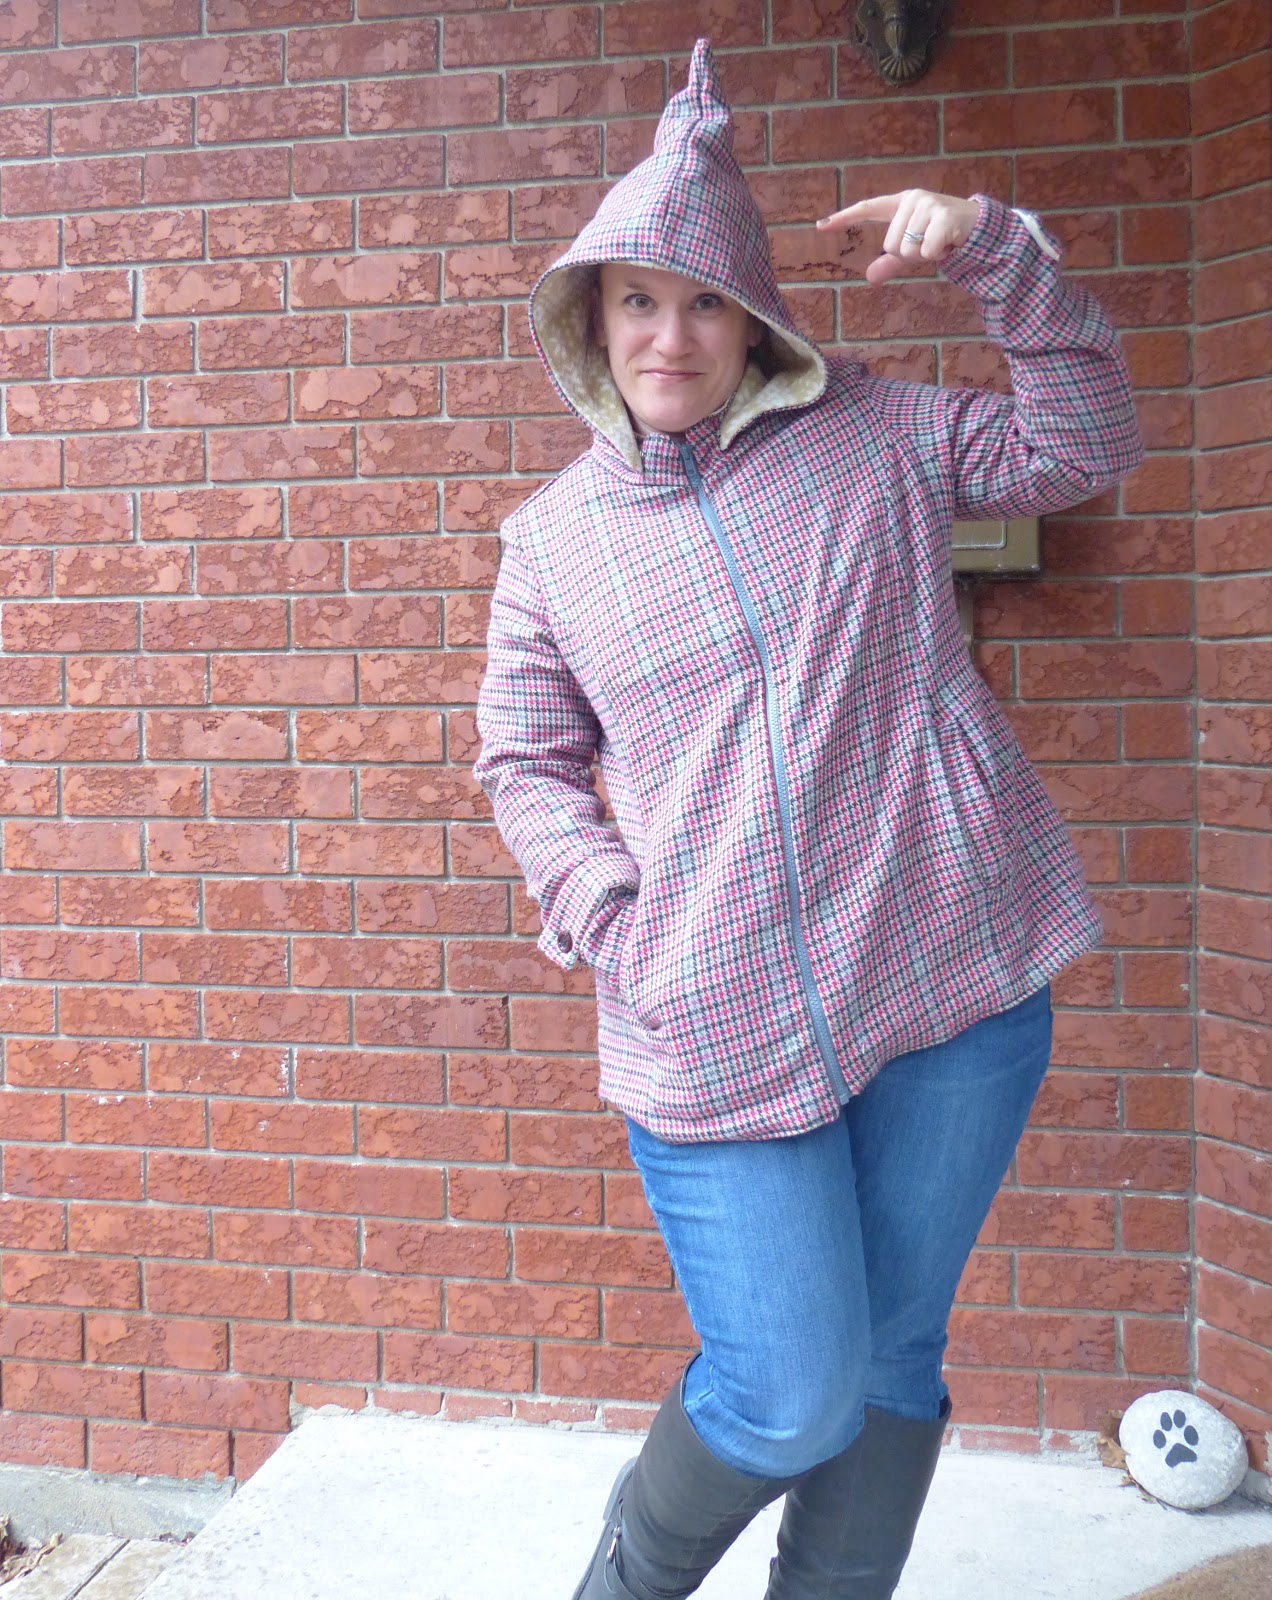
Pixie Hood Version
Round Hood Version


There *are* a lot of pattern pieces, but that's part of the magic - the design is meant to loosley hug your curves in all the right spaces, with enough room for a sweater underneath in the fall or winter, and breathable enough on those cold spring or summer dewy morning.

And really, the instructions are stellar - and include video instruction for those of us who are more visual.

It leads to a coat that looks store bought made with your own chosen fabrics!

I made two versions, and each version has a different hood - typical Round hood AND a Pixie hood for when I'm feeling mischevious!

I didn't have to use my seam ripper during the production of either coat, so that means the instructions REALLY are user friendly, as I typically do one rip on longer sewing projects, as I try to get them done in one sew.


My Round Hood version is made from fleece for the exterior, and a mix of some scrappy thick satiny fabric and flanelette unicorn fabric. 

Because UNICORNS!

I added the outside pockets and back belt to this version.

The hood is held on with snaps, so doesn't always have to be attached. I like the side blinders and hood coverage it gives me on car rides so I can close my eyes and the drive doesn't bug my Migraine as much (the side visuals are too fast for me right now).


INSIDE POCKETS!

The second is made from coat fabric I got for $4 a metre for another coat project that I ended up using a different fabric for. I knew as soon as I saw the Forester pattern testing come up that it was meant to be! 

Inside I used a few different silky linings and some of the leftover fleece from my round hooded version, as I didn't have enough one one lining fabric for the entire inside, but that's ok, as it's the inside, and they're complimentary colours!

I added both inside AND outside pockets, because one can never have too many pockets. And it has the back belt and sleeve tabs as well.

I'm 5'2", and both coats cover my caboose, which is great, as that area tends to get cold quickly.

I can wear a fleecy underneath, and am very tempted to make another Pathfinder Animal vest to go on underneath  and remove my removable hood on the occasions I pair both coat and vest together.

Actually....I could probably just hack an animal hood ONTO it - OMG - epiphany moment!  I'm totally doing that after work today!

 I can never be warm enough these days, so layering is extremely important.

Overall, the Forester Coat pattern is relatively easy despite the number of pattern pieces - challenge yourself and make yourself the perfect fitting coat today!  You'll be proud of yourself and look fabulous with the end results! 

Join the Twig + Tale Facebook group for any questions or to be inspired by others Forester coats (and beyond) - you'll love the whimsical feeling it will give you!