Wednesday, 28 February 2018

When Your Wardrobe is Made By You Most Days!


Some days I get to work and realize I made ALL my clothes! 
After a year of starting to Sew My Wardrobe, this seems to happen more often than not. And considering I feel I’m a slow sewer with my Husqvarna Viking Emerald (aka NOT a serger) and meticulous nature, the more you sew, the more efficient one becomes.

Why don’t you give it a try too?

Today I’m sporting:

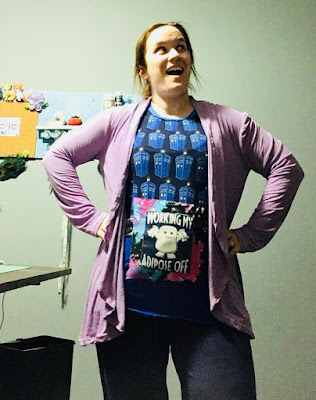
-        My Winter Wear Designs Cross Hem ¾ length sleeved top, which I used scraps for the smaller underlay from a beautiful velvet skirt I had no chance of ever fitting into again.   

To the left - look at that fabric cross! And my first V neck - perfection!


-        My Winter Wear Designs Provence Pea Coat – made with sparkly twill and stretch star fleece! I included the removable hood, however, need to add on a belt, as apparently my waist has come in a bit since the fall (boo yah!)

-        My 5 out of 4 Zen Pants – made with stretch suiting fabric with cute C/L I Lava You fabric inside the pockets because I’m silly. I made the back pockets too, because POCKETS!  This was an easy sew, and although geared for activewear, make the COMFIEST non-skinny pants at work EVER. I wear Zens at least twice a week to work. And I work in the office 4 days a week. They also make my behind look amazeballs!


My Rebecca Page Circle Cardie – These are another office Staple that I can’t stop wearing.  The flow, the speed to sew up, and the options. I find it also doesn’t use heaps of fabric.  There are even kids & doll sizes to up the extra cuteness factor!

Secret photo taken at work between people passing my pod.


Why sew my wardrobe?

My measurements are out of whack. No amount of Squats, lunges, or cycling will get rid of this booty, and after a frustrating experience looking for leggings in January 2017, my dabbling into sewing became my passion. Well as much as my wallet can afford fabric – never enough fabric to create most patterns with just one metre, so I’ve developed the knack of colour blocking and making 1 metre of fabric last through 2-3 garments (and then some!).
I want to try SO many fabrics, hence the 1 metre limitation most of the time – I just don’t want to miss out on fabric awesomeness.
My full bust is multiple sizes smaller than my hips, my upper bust is in line with my waist, and I have that hourglass shape with legs built for squats and cycling.

So I’ve become an expert in grading, measuring myself monthly to ensure proper fit.  I rarely make a muslin (or test) garment, trusting in the testing experience that helped bring the pattern into reality by the ever talented pattern makers I have grown to admire. 

There are pattern makers I love (you KNOW who you are!), ones I’d give my favourite fabric to just to test with them, and a few who left a sour taste in my mouth and I sadly won’t be able to create their garments any longer.

I’ve met cyber-friends across the Globe who share my passion, and put up with my silliness during pattern testing.  We all have stressful lives in some way, so I add a silly dance and groove it up for most of my tests (at least once) – once I know my pattern makers are a bit weird (in a good way) too!

Heck, I swear my friend, An, is my sister from another mother and father across the Ocean. Whenever we travel to Europe, I’m totally visiting her family and bringing her some Canadian fabrics to rub her face in and sew with (sorry An, it will be single metres!).

I have my go-to fabric places – Water Tower Textiles and Okee Dokee Fabrics (both Canadian) – and sometimes I can find some test fabric that isn’t totally hideous or overpriced at Fabricland, but this is rare most of the time.  Even their crap fabric is priced more than what I am willing to pay. I mean, if a test pattern actually works out first try, I’d at least like the option to be able to wear my garment vs just throwing it into the scrap pile or garbage.

So back on topic – sew your wardrobe. As long as you have a workhorse machine, you can do it too.  I had only sewn costumes before this adventure. Now there are few skills I haven’t tried thanks to the sewing community out there.

You can do it too!


More secret Pod photos at work!

***Affiliate Links Above used - I love these patterns, and without the help of those who love their patterns, marketing would be extremely difficult for the pattern makers we love and learn to love. Affiliate links help with the hours, fabric, and tears that go behind testing each pattern in order to provide a real-person view on the patterns for you (and me!) 

Tuesday, 27 February 2018

Sewing Pattern Review - 5 out of 4's Aspen Fleece Vest


At our cottage land, it gets chilly - sometimes I REALLY only need to layer my core, but I was lacking a fleece vest (and was jealous of the 5 out of 4 Halftime Hoodie I made into a sleeveless version for Husband)

So 5 out of 4 to my outdoor wear rescue yet again! 

I found the Aspen Fleece vest pattern, and had just purchased some stretch fleece for a jacket I was making, and just happened to have an extra meter of fabric.

So I paired it with some stretchy thick knit black and neon pink fabric for the lining, and have the most awesome core-warming vest for working outside at our cottage land.

I'm the most colourful gal at our cottage land!


It was perfect timing as the fall weather was a hit and miss, and we no longer had to wear bug jackets or rain coats.

I opted for a full zip and regular unzipped side pockets. 


The zipper instructions were easy to follow, as were all other instructions as normal with Jessica's patterns. 

I really like the amount of pieces in the vest, as that meant I could scrapbust a few pieces in and get the most out of my fabric. 

The high collar is really a bonus, as it keeps my neck warm while outside with just a hat on - once in awhile it's nice *not* to have a hood on something (rarely...but If I could have hoods, thumbhole cuffs, and pockets on everything I made, I would!).

But that doesn't stop me from wearing a hoodie tank top underneath!


So for the Spring, Fall, and Winter, this is another outdoor staple I will eventually wear out, thus will make a back up with the different pocket options for versatility!

And because I can.

Grab your Aspen Vest pattern, as I highly recommend it for your outdoor stylish wardrobe!

Monday, 26 February 2018

Mom's Craft Room Reorganization Surprise - Day 1


Growing up, my mom's sewing room was a little room made from melamine board walls...and looking back, there was no organization. I remember boxes dangling ready to fall at any moment, garbage bags full of fabric and unfinished projects (and hiding there MANY times sometimes for fun, other times out of fear).
 
 
So when I visited my parents before they left for Florida in December, I asked for something simple. Velcro and Elastic.
 
 
My mom checked at least 5 or 6 places, and I then noticed her room of chaos with new eyes!  No wonder she has half finished projects and procrastinates.  I wouldn't be able to work in that environment either. 
 
So begins my awesome train of thought that I would reorganize her supplies and make her workspace her oasis - Beach themed!
 
I have pictures of the after-Day 1 chaos before I gave up...likely after 8 hours of working on just taking everything apart! 


This was the Closet Before I even attempted to take anything out of it...it was actually the least scary part of this project.  Minus continually finding MORE fabric flowers just when I thought I'd seen them all.


This  is the oldest bobbin holder and pin cushion - I swear they are older than I am!  Good idea for someone with 20 bobbins...not so much with someone who has closer to 100 bobbins!


 These are also some of the oldest bobbins ever.  I remember these from when I was a kid. 
 
These have since been packed in a little plastic organizer with clear dividers - separated by colour of course!


The bins. The containers. The Lace. The scrapbook stickers.
 
 
The EVERYTHING! 


This is the left side of the closet...nothing is labeled, and it was so random what I found here.
 
On the left you can see the beginnings of my flower organization. By Colour.
 
Those containers...not big enough for most of the colours.


I no longer like fake flowers. 
 
 
The plan for each tin is to decorate it nautical themed - ribbon, lace, that fabric that you wrap around trees in the fall in preparation for winter (I can't think of the word right now).
 
They are labeled by flower, so no words.  Here's hoping Mom's not colour blind!


Look at them. Look at all the colours NOT organized!


Close up of the lace. This came home with me eventually to be separated and wound separately onto handcut 2.5" squared foam board pieces or clothes pegs if they were just little scrappy ribbon bits.
 
They filled an entire Blue Ikea Bag and then some.


Some of the scrapbooking supplies.
 
 
This was nothing compared to what I found throughout the upcoming weeks...


Left wall area - this is how I left if after Day 1...so many things to sort through!


This was the end of the day before the sun set - January 13, 2018.
 
Who knew 1.5 months later that I would still be at it?
 
I'm twitching just looking at this.


Thursday, 22 February 2018

Sewing Pattern Review - George + Ginger Mood Dress

Scraps - every sewists bane of existence.  
What do we do with scraps?  
With knits, depending on the stretch, they can be useful for colour blocking, undergarments, bands, and other little projects.  
With non-stretch wovens - it's more difficult to use up the smaller pieces. I use them for small projects like toys...but that is a rarity.  
 
Full Billy Book Case of colour organized scraps!

Scraps before I labeled colours on each bin
 

The George + Ginger Pattern collection came out with the "Mood Dress," which immediately inspired me!  
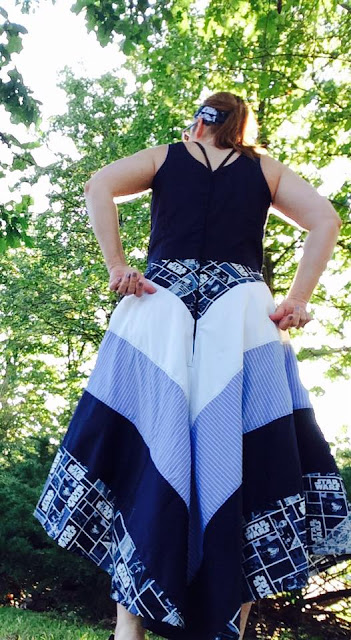
I am short at 5'-2", however, thus the initial length of the dress was daunting. So what did I do? I cut each of the mood strip pieces in half lengthwise in hopes that I'd have a knee length (or close to) dress.  
What I ended up with was a dress just below mid calf that is full of awesomeness and fun!  

With a fitted bodice, that fits perfectly with my G + G measurements (size 8 bust graded down to size 14 waist), and was a delight to sew.
  
Maybe not such a delight to cut, as each strip is individually cut x 4 pieces to create the chevron look.  
 
Some pieces near the bottom, like the Star Wars fabric (sorry, Husband, I had to have something with Star Wars in my wardrobe, even though I bought the fabric for you!). So I blocked a few pieces together on the bottom strips to make it work, and sewed a pretty line of lace and ribbon for any pieces I did this for.  
 
With the number of different complimentary patterns used in my dress, this is noticeable to me only - it looks funky and is definitely original!  
 
The Star Wars blends in, so I am able to actually wear my Mood Dress to my Business Casual office!  
 
Although I wish it were shorter (I'll add one less layer next time - maybe half the strips again for less length an add nice ribbon or lace to the bottom edging), I love it.  
It's flattering, sassy, and fun! 
 
it would make a great prom or fancy dress with the right fabrics - think draped silk or the fabric you see bridesmaids dresses made from!  
 
There is also an option for a gathered knee length skirt (no chevron colour blocking involved)....although I could attempt this dress again with the gathered skirt and chevron or make just plain strips length or width wise to still make this an awesome woven scrap-busting dress option for my closet!  
 
I love the sass and style of George + Ginger Patterns - the Mood Dress is no exception.  They put me out of my comfort zone at times, but make me feel beautiful once I adorn on of her designs!


Wednesday, 21 February 2018

Sewing Pattern Review - Rebecca Page Circle Cardie


The Circle Cardie is an amazingly quick sew with a multitude of looks from casual to fancy! 

It's best to be sewn with drapey fabrics for the perfect waterfall drape, but other comfy fabrics can be used as well. 
 
I used a cheap lavender Fabricland random drapey fabric for my muslin version, and a random loose sweater knit from Okee Dokee Canadian Fabrics. 

Both fabrics give a different flow and feel, and both are just lovely.  

The first version took me just over an hour to finish from cut to wearing, and the second took me just under and hour.  
 
Version 1 - long length

I couldn't wait to wear my short final version to work the day after making it!
 

The pattern takes less fabric than other cardigans I have sewn, and there are options for if you don't have quite enough fabric on the stretch and don't mind a middle back seam.  

The different options include: 

- 2 length options (short or long) 

- 3 hem options (Plain, band, or ruffle) 
- 3 sleeve options (sleeveless, 3/4, and full length) 

- Doll, Child, and Ladies versions available up to 5XL! 

As I work in a cold office where I feel like I'm going through hot flashes for 5 minutes and need a parka the remainder of the day, this is the perfect office casual cardigan for me.  

I opted for both of my versions to be long sleeved, but my lavender version is long length, the black and white sweater knit version is short length. I didn't have enough fabric for the ruffle on my black and white knit, and didn't want to get too fancy with my lavender version, but I can't wait to sew the ruffled version when I make my next flowy fabric order! 

The arm width is perfect - not too loose, and not tight. This can be an issue sometimes as I have a wider bicep than some designers use with their bust measurements and it's a hit or miss whether or not I need to due a bicep adjustment.  


I blame Beachbody, yoga, and throwing wood into one of our fire pits for 2+ hours a day at our camp for my pipes.  

The length is perfect - I'm 5'-2" but have a longer torso, so no adjustments were made. I do prefer covering my behind, so that's another reason I don't really adjust top or sweater lengths. 


Overall, I wear my cardis every week at work and really need more - because they are perfect for the office, but also on the go for pub night or games with friends.  

So if you're a bit afraid to sew your own cardigan sweater, don't be - Rebecca's instructions and photographs are on par and she guides you with every step.  

There is also a Cole's notes version of instructions for those of us who don't require pictures and more direction with our sewing projects. This saves a tree if you prefer printed patterns vs having the pattern on your computer or tablet while sewing.  

Another winner in my closet - I highly recommend the
Circle Cardie!


SO excited about my Cardie!


Monday, 19 February 2018

Sewing Pattern Review - Bella Sunshine Design's Alice Pleated Dress

I love a bit of vintage flair and the little touches with my sew-me-clothing - and the Alice definitely brings both into to ball park.

It is elegant, reminds me of Alice in Wonderland, and I made mine...with a sheet we didn't use! 

Seriously! 

Although it lacks options (hint hint for a tie belt, full sleeves, or even a top option), these are things that at this point I can hack, and many new sewists appreciate not having too many options.  Options lead to confusion while sewing, and losing your spot in the pages.

Right now with the deep freeze winter we've had, and lack of snow like we used to get back in "my day," Alice remind me of Spring and summer Garden Parties.  And would be perfect for an Alice in Wonderland Tea Party or even Murder Mystery game

Freezing Rain during photo shoot


Sewing wise, I took my time to ensure I didn't miss any steps (one must not miss steps or assume, as that leads to seam ripping and alcohol), and it went together perfectly.  I wasn't confused during any of the steps, and it took me an afternoon to sew up. 

The sizing is right on, and I took a leap of faith and went without a muslin version (yay!) - Melissa and Danielle at Bella Sunshine Designs know their patterns and I learnt not to deviate from their sizing recommendations, pending *I* measured myself properly right before sewing.

I am hippy and have a booty, and this dress surprisingly doesn't make my booty look big or my hips look wider, so I'm quite impressed, considering some pleated dresses in the past have gone to the "not happening" pile as they enhanced what I try to not enhance.

My booty


So size and style = happy Unicorn!

The features included are:
- Pleated skirt
- Back zipper
- Fully lined
- Options for bias trim collar
- Cap sleeves (lined)
- POCKETS!!!
- Patterns for each cup size (= perfect fit)

Features I'd like to try hacking:
- 3/4 length sleeves (or knit sleeve underneath the cap sleeve)
- Sash or belt
- Slimmed down skirt so I can attempt to wear this pattern at work
- Shirt Length

Overall, it's a great pattern for those looking to enhance their sewing skills and sashay their vintage flair!

Awesomeness!


Try out Alice today and be impressed with the end result!  There is even a Girl's version for your little ones if you want a matching outfit!


Sunday, 18 February 2018

Pattern Review - New Horizons Tami Revolution Double Hoodie

Back in April 2017, I didn't have a lot of true sewing experience, but sew-a-longs and pattern testing have changed that - the challenge in my mind vs reality were totally different.

Last year I participated in my first sew-a-long with New Horizons, and won a lovely bundle of fabric for my completed hoodies! 

Thank goodness for the sew-a-long though, as it included a useful link for how to make thumb hole cuffs (which I ADORE thanks to my past life love of Lululemon clothing).

The Tami Revolution Double Hoodie had my interest at the Thumbhole Cuffs, hood, pockets, and a new sewing challenge - a full zipper (or any zipper).

THUMBHOLE CUFFS!!


The only zipper issue I had was user error when I was too tired, and accidentally cut into the zipper nubs mid-way completing my hoodie, and had to go out and get a replacement zipper. The sewing part was super simple, and I was able to follow directions as a person who had put in maybe 2 zippers into anything over my lifetime.

Zipper (and more thumbhole cuffs - can you tell I'm excited?)


As a more beginner PDF sewist, understanding directions for a multi-option pattern were confusing - but today I can use multi-option patterns like it's nobody's business.  Why?  For example, the pages zip from page 5 to skipping over to page 15 then back to 11, depending on your options - making the sew-a-long steps easier to follow than the actual pattern at the time.

*But* Terra has been working hard with her pattern testers for more fluid patterns, including You Tube video links for more difficult to understand concepts.  I continually use the thumbhole cuff tutorial every time I make them, as I can't understand the instructions written, no matter HOW they are written - I'm visual like that). The New Horizons Group is also helpful for any inquiries or how-to's.

The end result of creating my first hoodie was a proud achievement. And MUCH easier than I expected.

Wearing it in OUR forest!


The options for the Hoodie include:
- Double Hood
- Crossover Hood
- Standard Hood
- Front zip
- Thumbhole Cuffs
- Standard Cuffs
- Shoulder Zip Accent
- Drawstring
- Kangaroo Pockets
- Side Pockets (POCKETS!!!)

Probably not the right inner fabric (thick silky retro fabric), but I love the hood!


And sizes range from XX Small to 26.  What does this mean?
- Bust - 29" to 51.5"
- Waist - 23" to 47"
- Hips - 31" to 53.5"

I wore mine almost every weekend at camp - and it kept me plenty warm - and I admit is quite cute - I know I was hoarding that beautiful teal cherry blossom stretch fleece for a reason! 

I still wear it while working from home Fridays, as it's cold in the basement!

So grab your Tami Hoodie pattern today and experience the satisfaction of a useful and versatile pattern for cozy nights and brisk mornings!