Showing posts with label rebecca page. Show all posts

Tuesday, 5 November 2019

Live Life and Love Purses - The Rebecca Page Zoe Zip Pouch Sewing Pattern

Purses are like friends - you can never have too many!

Just like the Rebecca Page Patterns Zoe Zip Pouches - betcha can't have just one!


The Zoe Zip Pouch sewing pattern includes:
-  patterns for all 5 sizes of pouches
- Fully lined interior
- Zip tab & pull options


The smallest sizes are perfect for lip balms, gift cards, and little treasures. 

I made all of mine with the optional zip tabs & pulls - and they are definitely a great finishing touch.  It was also a nice way to use some fun scraps and odd coloured zippers I had in my stash. 

Once I made my first Zoe, it was pretty easy to make the other 4 sizes!


I added an interior pocket into one of my Zoes - by sewing the pocket onto the lining piece before sewing the lining and main fabrics together.  

I got the pocket pattern from the Rebecca Page Ultimate Patch Pockets Pattern here.  I did intend to sew a few more pockets on my Zoes, and totally zoned out and forgot! Next time!


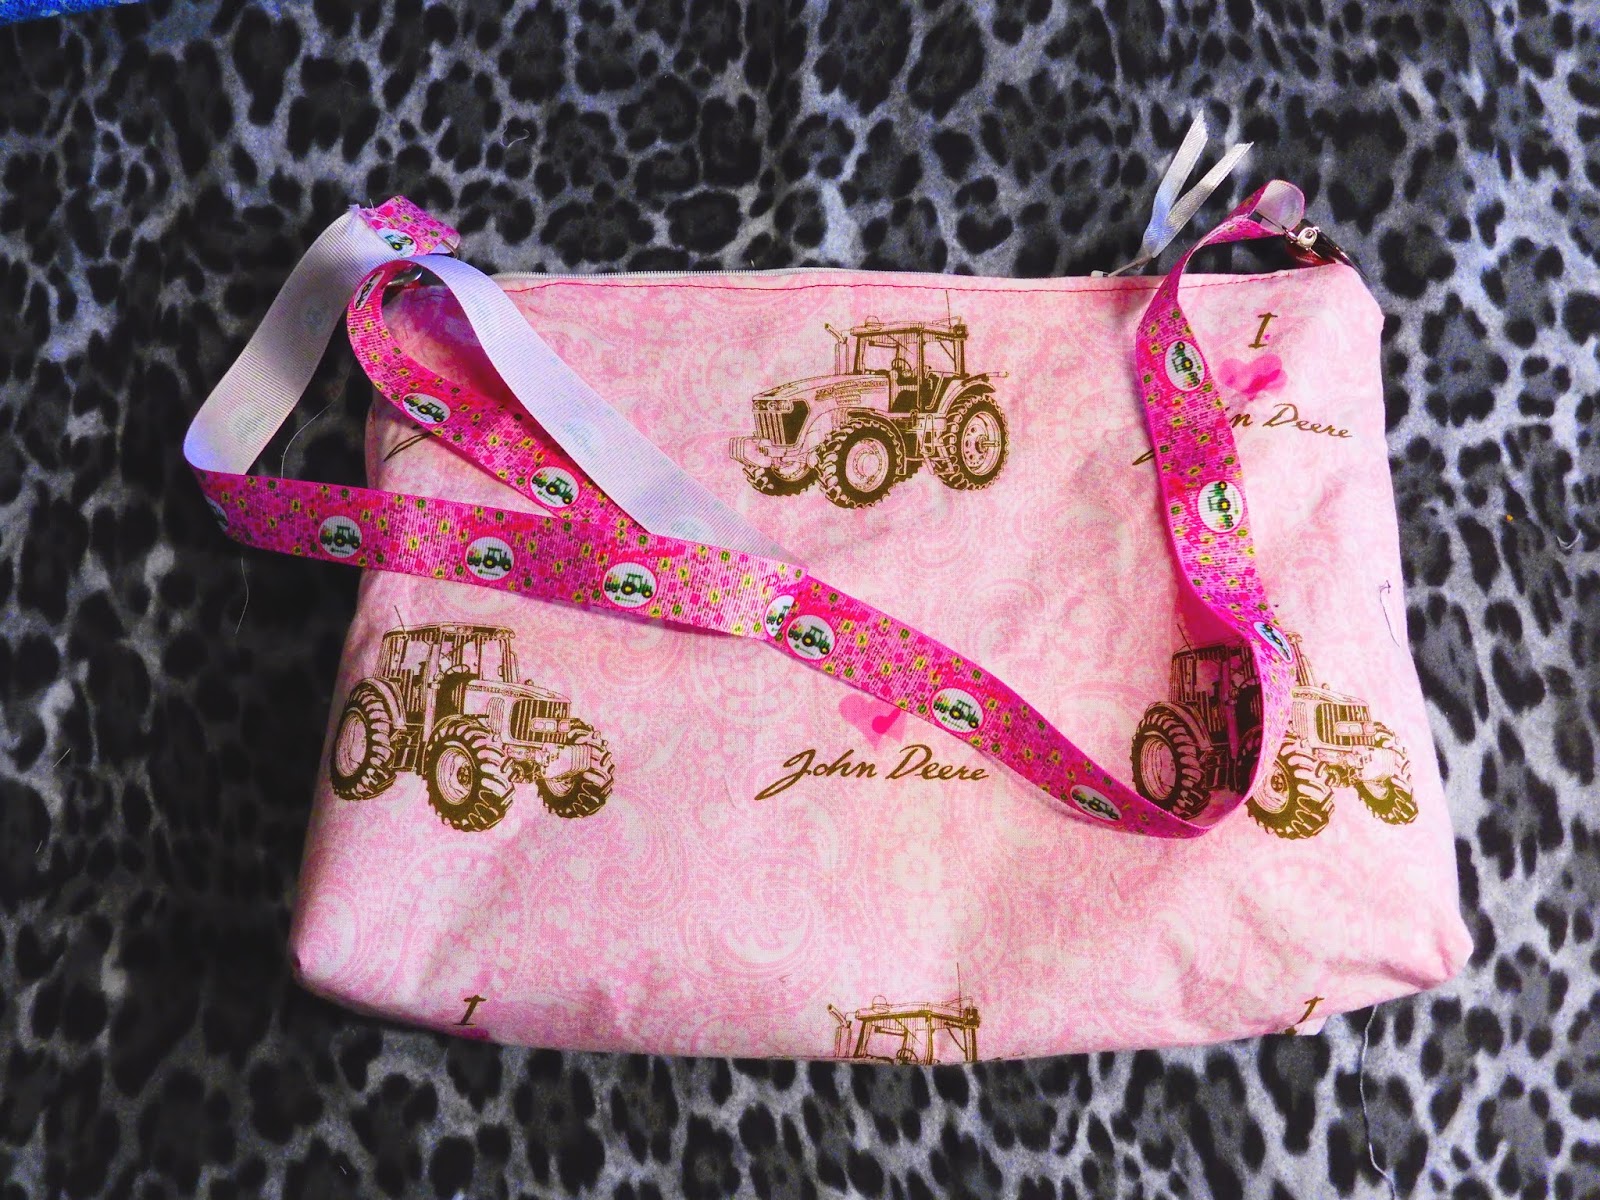
To the larger sizes, I added suspender clips to each tab, and sewed a long piece of ribbon onto each clip.  Therefore the clips are removeable, or can be colour co-ordinated with my nieces outfits (Merry Christmas gifts for them!).  


Overall, I am giving so many Zoes as gifts for Christmas - particularly as Gift Card holders - as no one ever knows how to wrap a gift card.  This pouch has a purpose and can be reused after gifting it. 

So get your Zoe pattern here and learn some easy zipper skills to make a professional looking purse.

***Affiliate Links Above used - I love these patterns, and without the help of those who love their patterns, marketing would be extremely difficult for the pattern makers we love and learn to love. Affiliate links help with the hours, fabric, and tears that go behind testing each pattern in order to provide a real-person view on the patterns for you (and me!) 

Wednesday, 2 October 2019

Always Be Yourself Unless You Can Be a Unicorn. Then Be a Unicorn via Rebecca Page's Unicorn Cape Sewing Pattern

Life's all about Rainbows, Glitter, and Unicorns. 

Sparkle a little more each day with Rebecca Page's Unicorn Cap Sewing Pattern

It's a beautifully designed costume, play, or "keep me warm" cape with several options:
- Main Cape with lining
- Eyes
- Ears
- Optional Mane (this is a MUST!)
- Optional Velcro neck closure
- Optional Wrist elastics


So I actually sewed this up for one of my nieces for Christmas...but you know...had to test it out. 

This is size 7-8.

I LOVED every aspect of sewing up this Unicorn Cape

From the cute felt heart adorning the front corner, the eyes with pretty lashes, Heart Nostrils, fun horn, and the mane...it's just stinking adorable!


The mane and horn are my faves!

I used this ribbon gem strand I've been hoarding for several years to wrap around the horn (hand stitched in place every inch or two in order to prevent movement), and it was meant to be a unicorn. 

For the mane, I used a plethora of different styles of yarn and ribbon that I've just had stashed away - and the colours and different textures worked out beautifully. 


The most tedious part of the cape *is* the mane. It took me two episodes of Lucifer to cut through all of the different ribbons, lace, and yarn that I chose, but it was SO worth the effort in the end. 

I made the longest length mane - you can certainly make yours as long or as short as you like. 

Again, keep in mind, I'm 5'-2", and this cape was made for a 7 year old, not a $)#$*& year old. 

I'd totally wear this all day, and can't wait to make one for me for those days I'm working from my home office and need some sparkle and magic. 

I've needed a lot of sparkle and magic this year. Maybe a cape would help it stick. 


So me wearing the cape...this is our secret, right?

Grab the cape bundle here now to bring a bit of magic into your home or someone who really needs it. 

xoxo

***Affiliate Links Above used - I love these patterns, and without the help of those who love their patterns, marketing would be extremely difficult for the pattern makers we love and learn to love. Affiliate links help with the hours, fabric, and tears that go behind testing each pattern in order to provide a real-person view on the patterns for you (and me!) 

Wednesday, 10 July 2019

Unicorns, Unicorns, EVERYWHERE! Rebecca Page Patterns Unicorn Doll Sewing Pattern

Always be yourself, unless you can be a Unicorn.  

Then always be a Unicorn. 

Rebecca Page Patterns has a lovely new handsewn Unicorn Doll Pattern.  

The pattern includes:
- A whimsical and magical unicorn pattern

- No machine required - can be stitched completely by hand (hello, camping project!) 

- Beautiful mane (with as few or many hair wisps as you'd like!)

- Button or doll joints for the legs


I am a bit of a Unicorn fan, so jumped at the chance to create my very own Unicorn!  

Hand Cutting out all of the pieces deems a netflix episode (or  two) - and I know a few testers used their Cricut machines to cut out their pieces even quicker (don't ask me how  - I don't own such Wizardry!). 

Then the stitching begins. 


The tail is first - and can be plain, fully stuffed, or partially stuffed and embroidered.  I opted to match my felt fabric colours with some embroidery thread.  

Make sure to stuff the tail VERY lightly in order for this to work.  


The horn is super cute - and you can be as creative or basic as you like.  I glued some pink string beads onto it in a circular motion for a blast of colour. 

And look at those eyes!  I used iron on fabric for the eye, and embroidery thread for the lashes.


And THAT MANE.

It's pretty gorgeous! I think I used about 40 pieces of hair wisp to create this, and I love the way it looks. 


I did just sew the legs on - no buttons, no doll joints...just plain. Sure they don't move, but he's okay not moving. 

Why move when people will move you instead? 

Sparkle Fancy Feet is smart. 


Play with Fairies. 

Ride a Unicorn.

Swim with Mermaids. 

Chase Rainbows. 

Give your try at creating this gorgeous Unicorn toy - and give old-fashioned hand sewing a go. 

You and any kiddos you can safely round up will enjoy this as a great summer project!


***Affiliate Links Above used - I love these patterns, and without the help of those who love their patterns, marketing would be extremely difficult for the pattern makers we love and learn to love. Affiliate links help with the hours, fabric, and tears that go behind testing each pattern in order to provide a real-person view on the patterns for you (and me!)  

Tuesday, 4 June 2019

Let's Go! The Rebecca Page Tote Bag Sewing Pattern Review

I love reusable bags - just not the quality of the ones at the grocery store check out. 

The Rebecca Page Tote Bag Sewing Pattern has provided me with a useful grocery, travel, and tote bag that not only looks cute, but has many POCKET options. 

You all know how much I love pockets. 


The options the bag includes are:
- Plain with just straps
- Front and back pocket options
- Plain inside
- Interior zippered pocket (one or two)
- Interfaced, thus stands on its own


My first bag uses scrap cottons for the strap, lining, and pockets; and the exterior is a cute Unicorn/Llamacorn fabric I found at Walmart. 


It can hold my Rebecca Page Unicorn Pillow - so you can see it's a pretty decent size both in height and width. 


My second Tote is made from an old cotton sheet (the floral orange), scraps for pockets, and a cute sleepy Llama/Bear/Sloth fabric, also found at Walmart. 


I love the pocket placements and sizes, and the whole sewing process is relatively simple and pain free. 

It's well worth the extra touches to include the zippered interior pocket, exterior pocket(s), and topstitch both the top of the bag and handles. 


My final bag is made from a baby fleece and cotton fabrics - I didn't use interfacing in this version, so you can see how it droops (like a normal grocery tote), especially the interior. 

There's nothing wrong with that either - just be aware the lining won't be taut as it is with interfacing.


 Overall, it's a recently quick sew, and the instructions are easy to follow for the novice to advanced sewists. 

Grab your Tote Bag pattern here, and sew away! 

***Affiliate Links Above used - I love these patterns, and without the help of those who love their patterns, marketing would be extremely difficult for the pattern makers we love and learn to love. Affiliate links help with the hours, fabric, and tears that go behind testing each pattern in order to provide a real-person view on the patterns for you (and me!) 


Thursday, 9 May 2019

Twist and Shout with Rebecca Page's Talia Tunic & Twist Top Pattern


Some days I'm dark and Twisty like Meredith Grey.

Other days I want to Twist and Shout (before my back suddenly gives out).

Either way, I really enjoyed making the Talia Tunic and Twist Top patterns.  Together, they enhance what I've been blessed with. Apart...well...they have the same effect. 


The Twist top has multiple arm lengths, and hugs my bust in a lovely way!  

Sewing it up, DEFINITELY read the instructions AND watch the video.  The instructions are a bit confusing at first.  Sewing the second shoulder seam is definitely a lot more confusing than the first. 

That could also be migraine brain getting super confused lately. 

I only needed to take my seam ripper out once before I got the concept. 

I recommend a straight stitch the first time around sewing the shoulder seams...JUST in case. 

I've paired this Twist Top with my favourite pair of Pippa Pants. 


As you can see, the Talia Tunic is the perfect length. 

I'm 5'-2" and didn't hem it - the lovely wonders of soft knit fabrics that don't fray. 

I paired my Tunic above with my Mini Peggy Skirt and one of the last non-me-made leggings in my wardrobe.


This Talia Tunic is a lovely DBP - again, unhemmed and super flowy.  I just love the feel and the drape. 

The front and back gathers along with fabric choice bring this top together. 

The binding is MUCH easier to make than anticipated - the instructions are detailed verbally and with pictures, and you can find the perfect strap length for your body with one quick fit test. 


My final Twist top has 3/4 length sleeves, and is made of a lightweight stretch lace/velvet fabric. 

It has pretty Tardis blue within the black fabric.  

It has been paired with my hacked Slim Cargo Pants. 


Overall, this pattern can be as casual or fun as you like - and I definitely recommend lighter weight knits to keep with the flow. 

A boxier cotton lycra or scuba for the tunic would make it larger and not flow well - but may work well for the twist top. 

Enjoy these quick sews - they'll certainly become staples in your wardrobe in no time. 

Get your Talia Tunic here.

Get you Talia Twist Top Here


Bundle it up Here.

***Affiliate Links Above used - I love these patterns, and without the help of those who love their patterns, marketing would be extremely difficult for the pattern makers we love and learn to love. Affiliate links help with the hours, fabric, and tears that go behind testing each pattern in order to provide a real-person view on the patterns for you (and me!) 


Monday, 22 April 2019

I'm Just a Vintage Soul - The Rebecca Page Vintage Blouse Pattern Review

Get your happy on with Rebecca Page's Very Vintage Blouse!

It's the modern twist on a vintage vibe blouse.

Options include:
- Billowy or straight sleeves
- Gathered or darted bust
- Plain or pintucked bodice
- Short or long cuffs
- Round or Pointed collar


It is also part of The Blouse Collection - 4 patterns for one price (40% off regular price!!) - click on the blouse to bring up my blog posts for each blouse!
- Very Vintage Blouse
- Madison Blouse
- Brielle Blouse
- Riviera Ruffle Blouse


It can be worn alone as above - I paired it with my hacked Slim Cargo pants - to show all the proud sewing you have completed.


Since making Rebecca Page clothing, I have gotten really good at plackets, hidden seams, and all the professional touches each pattern teaches me.


I opted for the gathered bust, plain front, regular collar, and normal sleeves as I was running low on time and wanted to ensure my blouse making skills were still intact.

I really love the gathered bust, as it showcases such a feminine vintage flair within the blouse.


You can also office it up by adding a sweater vest - yes, I just said sweater vest.


I've given up being freezing when I'm in the office. And I felt my hacked Vivianne Sweater from Halla Patterns was appropriate.


The back is a bit wonky - I actually made a centre seam and took it in 1" on either side as the top was too billowy at the back for my liking. I should of stopped just below my waist, as you can see, my hips aren't too keen on keeping the back down.  Meh - it still looks good and is SO comfy.


Fabric - some random shirting fabric I got for making a shirt for Husband - but he dug his feet in (he's SO picky with clothes and is a weird shape), so I am just using his fabric.

Fair is fair.

See the side view where the gathered bust area is - LOVE! 

And the armcycle is comfy and not too tight - my biceps seem to be hulk like with some patterns (bust size doesn't always equate to proper bicep circumference with slimmer fitting sleeves).

Oh Rebecca, you certainly do know how to woo a woman!

I really do wish my life had background music so I could tell what the heck is going on - but until that technology happens, I'll sew on - will you sew your Vintage Blouse on too? 


***Affiliate Links Above used - I love these patterns, and without the help of those who love their patterns, marketing would be extremely difficult for the pattern makers we love and learn to love. Affiliate links help with the hours, fabric, and tears that go behind testing each pattern in order to provide a real-person view on the patterns for you (and me!) 

Bring on the Waves! Rebecca Page Patterns Riviera Ruffle Blouse Review

Just another day on the Riviera where every hour is happy.


One of my goals this year is to sew up the patterns I have now and cave into only the best of the best mid way. I'll be happy with a 2-1 ratio (sew 2 I own, obtain 1 new trend to sew).

Rebecca Page's Riviera Ruffle Blouse pattern sat in my to-do bin for a good year before I decided to sew her up (FINALLY) last week.


The Riviera features:
- Sleeveless or Flutter Sleeves
- Beautiful cascading front ruffle option (or ruffleless!)
- Side cut bias panel options
- Sizes XXS to 5XL
It is also part of The Blouse Collection - 4 patterns for one price (40% off regular price!!) - click on the blouse to bring up my blog posts for each blouse!
- Very Vintage Blouse- Madison Blouse
- Brielle Blouse
- Riviera Ruffle Blouse


I opted for the flutter sleeve, full ruffle, side bias panels.

The main fabric is a sheer random fabric that was in my stash  already - which paired with a tank top year round or bikini top in the summer, makes this pattern even more elegant.

Honestly, the flutter sleeves are repurposed from one of the last remnants of my clubbing days in Toronto - a La Senza skin hugging, mid-thigh "nightie" that I will never fit into again (goodbye size 2 days). But the pretty meshy overlay was too pretty to dispose of. It seems to pair well with the black sheer fabric I used!


I also paired the top with my hacked Slim Fit Cargos (tutorial to come soon!). 

The Riviera fits perfectly, and grading from Medium bust to XL for my hips makes this top hug my torso in all the right ways.

The only thing I would change for next time, is to lengthen the top to at least mid-behind - I prefer longer length tops.

But seeing as it's really a layering top due to my fabric choice, it's not a huge deal for my first Rivera.

 The side panels are beautiful - like princess seams - and I like that it's an added option. 


All the steps were well laid out in the instructions, and I didn't have to take out my seam ripper once.


The front ruffle cascades beautifully as well - giving the top a nice feminine touch.  Without the ruffle, it would be a more neutral look.

Tip: DEFINITELY use light fabric - anything that doesn't cascade will leave the ruffle looking boxy and forced, and won't be as light and delicate as mine is.

Just a head's up for those wanting to use quilting cotton or similar stiffer fabrics. For the main portion of the top, those choices are fine, but you'll want to use a complimentary light fabric for the ruffle.

Overall, I'm happy with my Riviera, and it's the perfect addition to my summer attire - hopefully yours too!

***Affiliate Links Above used - I love these patterns, and without the help of those who love their patterns, marketing would be extremely difficult for the pattern makers we love and learn to love. Affiliate links help with the hours, fabric, and tears that go behind testing each pattern in order to provide a real-person view on the patterns for you (and me!)