Wednesday, 27 February 2019

Rebecca Page's FREE Unicorn Pillow Sewing Pattern Review

Anyone who knows me, knows I am generally the unicorn in the room - full of mystery, magic, and tries to see the rainbow at the end of the dreary clouds. 


The last year and a half has been a struggle to keep my Unicorn, and I've lost her a few times...but I knew Rebecca Page's newest pattern would help bring her back out again! 


This lovely Unicorn pillow pattern is FREE (I love free!) and is a great way to sew up your sparkly ribbons and fabric with a magical pillow to reward yourself with.

I made a more traditional Unicorn, and a funky Galaxy out of this world Unicorn to bring out my geeky side.


The galaxy unicorn was made with baby fleece fabric from Okee Dokee Fabrics and is SOOOOO soft and snuggly.

It is darker than traditional Unicorns...but I'm a bit of a goofball and dance to my own beat.  I felt this was an appropriate choice.


The Ears are made from iron on fabric and a hairy ribbon I've had for eons from my hardcore scrapbooking days mystery packs. It is PERFECT ear hair for this unicorn!

I just used double sided sticky 1/4" interfacing tape to attach the hair - and the iron on fabric I just ironed on - no sewing for this part! 


The eye is also iron on fabric - making it SOOOOO easy to attach.  They have funky colours and patterns at Walmart, and it makes the small hand sewing of projects like this unicorn pillow SOOOOO much easier to deal with.


The Horn is also a bit of a cheat vs the pattern instructions - I took out my Dewalt Glue Gun (a Christmas gift from Husband - and YES I love tools and other practical equipment for gifts - I'm a weird woman).  I just glued this fun sparkle gem "ribbon" (again, from a random scrapbooking mystery pack eons ago), and it will hold up for some time.


And despite pinning, sewing slowly, and unpicking the head part twice (once as I misplaced where the ears should be, the other because the horn basting seam was showing), the horn just kept showing the basting seams, and I didn't want to unpick the seam in case the horn exploded.   So I took out my trusty glue gun again, and placed a matching ribbon and more sparkly gems at the base of the horn to cover up the seam.


No one knows. Except me and you.


I LOVE this soft shimmery fabric I used for the mane.  Paired with 2" back ribbon, it gives my Unicorn a pure universal appearance! 


My traditional Unicorn Pillow is so pretty and used up some scrap fabric that must of been waiting to be made into something magical.


All the fabric is random from unknown sources - and all woven. 

For the horn, I used some rick-rack (and tacked it in every few inches, by hand sewing) - and it looks great.


The mane is a random green/turquoise shimmery fabric that I had just enough of - it must of been fate! 


Sewing the multiple layers of fabric wasn't too difficult, pending your setting on your machine is more forgiving (higher needle setting), you use lots of pins, and you just take your time. It is well worth the effort.


Again, I used iron on fabric for the eye and the nostrils.


And as proof of my love for Unicorns....here is me riding down our river at our cottage lot - it's a 10KM (4-5 hours) ride down the river...and nothing is more magical that doing it in my ergonomically correct unicorn float! 


Get your Unicorn Pillow pattern for free, and let your magic flow!


***I sew for the passion, fun, and confidence it gives me. Affiliate links have been used, but I only promote what I believe in and adore ***


Monday, 25 February 2019

Rebecca Page Patterns Review: The St. Tropez Swing Top = Memories of Summer

The St. Tropez Swing top *may* look daunting with its beautiful open back finishing, but with Rebecca Page's detailed instructions, even a novice sewist can tackle it!


It reminds me of summer. Which is certainly not here, as the winds make it feel like -30 Celsius (-22 Farenheit) today.


If someone gifts me a trip to the Mayan Riviera, I'll have a drink for you and wear my St. Tropez!


It's a lovely swing top pattern that offers several options:
- Top or dress length
- Optional sleeves
- Optional belt
- Knit OR WOVEN Fabrics
- Ladies sizes XXS to 5XL and Newborn up to Girls Size 12 (Pssst - Bundle them for 20% off)


The back opening is quite simple - with a bit of bias tape (or you can make your own - instructions included), buttons, and facing fabric, you learn (or perfect) a few techniques. 

A bit of gathering and some buttonholes, and the back opening is done.  You don't even have to undo the buttons to get the top on and off!


I graded from Medium to XL from my bust to hips, and its' not too tight at all!  I actually took an inch off the bottom "triangle" shape so it was a bit slimmer fitting.  Especially since my fabric wasn't super drapey, despite being a very light mystery cotton.

Now I'm ready for Plaid Fridays at work...if I ever go into the office on a Friday (I work from home currently thanks to my Vestibular Migraines and horrid office lights - I'm like Golem in my hobbit hole).


I used the tie option, as I wanted to accentuate my bust and natural waist, and take attention away from my hips.  With my fabric choice, again, it would be a bit too tent-like without some sort of cinching here.

Overall, it was a nice sew, and my measurements didn't fail me again.


I paired mine with my lovely Cinch sided Pippa Pants.

That's what I love about Rebecca Page Patterns, and you can and will too:

- Read the Directions as to what type of fabric to use - this section will also advise how a garment will look on you if you choose certain types of fabrics (i.e. quilting cotton will make this top look boxy, a flowy lightweight viscose will let it flow)

- Don't skip steps - even if you think you know what you are doing - you will end up unpicking work otherwise


- Drink your tea (or wine) and sew on!


Grab your St. Tropez pattern today!


***I sew for the passion, fun, and confidence it gives me. Affiliate links have been used, but I only promote what I believe in and adore ***


Wednesday, 20 February 2019

It's Cozy Time - Rebecca Page's Family Bathrobe Review

I am cold all year round.


Might be sitting in a chilly basement office all day long, might be genetics, it might be my destiny to not live where it's below freezing half of the year.


The Rebecca Page Family Bathrobe is a really versatile robe/housecoat/bathrobe from newborn to unisex adult sizing.


It has several fun options:
- Pockets (YOU NEED POCKETS!)
- Belt
- Hanging Loop


I love that I was able to use both woven AND knits with mine - especially since the 2 metres of fabric I had ran out before I could cut my sleeves.  Comfy DBP (Double Brushed Poly) to the rescue!


My polka dot DBP was from Water Tower Textiles, and the fun Canadian outdoors baby fleece was from Okee Dokee Fabrics.


I really like how the collar drapes - and you can hide the seam either by top stitching on the outside (with seam pressed towards the inside), or add some fun decorative trim. 


It's not fitted, so I just went with my bust measurement, despite my bust and waist/hips with Rebecca Page patterns going from a Medium to X-Large grading typically.


I had no issues sewing it up quickly, and really like length - I took 4" off the length as I'm only 5'-2" and didn't want it too much past my knees. It's designed for a height of 5'-8" - not the typical height design for RP patterns - so do check this before cutting.


It gives me just enough wrap without feeling like I'm in a Snuggie (adult blanket that has arms in it).


I paired my robe with my altered Pippa Pants and my Strappy Cami - a good bedtime combo, if I don't say so myself.


Overall, I love that it's a bundled pack - where one pattern fits all! 


Get your own Bundled Bathrobe pattern here! Or just the Adult version here.

***I sew for the passion, fun, and confidence it gives me. Affiliate links have been used, but I only promote what I believe in and adore ***

Friday, 8 February 2019

My Sewing Room Organization - Keeping the OCD in Check


Every year I tend to do a bit of a reorganization of my craft room.  

This year, my fabric was REALLY bugging me. I had it all stuffed randomly in a dresser, and had no idea what I had.  

And so began 2 weeks of not only reorganizing how I sort my fabric, but also tweaking my other crafty doo-dads along the way. 

This was my computer desk/craft drawer area before. Not TOO disorganized, but it could use some tweaking.


I labeled the drawers so I know what is where, using low grade chalk marker labels, Washi tape, and my Sharpies.  A Glue gun finished it off by holding the not-so-sticky labels onto the drawer fronts.


I have large plastic separated containers within each drawer (all from Ikea), and sorted my sewing and craft items by type. 

For the ribbons, elastics, lace, and bindings, I wrapped them onto binding boards (I have a LOT from a family donation, and they have come in handy for organizing ribbons, etc.) by rainbow colour.  They are sorted by type into the separate compartments for easy access.


Onto my closet - which mainly holds crafting (non-sewing) items.

I find these hanging organizers (again, from Ikea) are great not only for clothes, but for organizing craft supplies! 

Before on the left, and after on the right.

Everything is labeled, placed into the compartment or collapsible Ikea drawer boxes, folded, and organized by craft type.

Paint and scrapbook stickers (organized by type in 3 photo boxes - alphabetically, of course) are on the closet floor. I have a lot of craft stuff.


Onto the fabric.


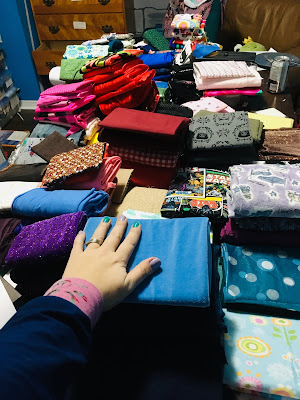
I had fabric in 2 bins, a dresser, in the closet, and behind the big comfy chair.


So I piled up fabric bit by bit...and here's what I did! 


I purchased 200 comic book boards from Amazon, and started folding.

Place the board centered a few inches away from one edge of the fabric piece.

Then fold the top and bottom edges to cover the top and bottom of the board.


Then fold over the small side - either square or like a letter - the letter fold just makes the edges look prettier.

The next step is easier if you pin the corners of the inner fabric (the envelope part) to the top and bottom edge so it stays still while you start to fold.

Keep the top and bottom of the fabric folded to the same length as the fabric, flip the board, tighten the fabric around the board, and continue flipping until you get near the end.

Fold the edge of the end of the fabric (length) as pictured in the second picture, and you will do your final flip.


Pin the top and bottom, and your folded fabric is done!


 For different sizes of fabric, I either used the entire Comic Book board, cut the board in half once, or cut the half board into half - for 3 different board sizes. 


Look how nice and neat my fabric is now!  SO easy to see what I have and fun fabric no longer gets lost in the shuffle.

It took me about 3 evenings to fold all my fabric. 


Look how nice and organized my drawers are now!

I organized them by size of board (small and medium), colour, and type.  For example, the top drawer started with pink small boards - stretch then woven fabric. Then red small boards - stretch then woven fabric. And so on.


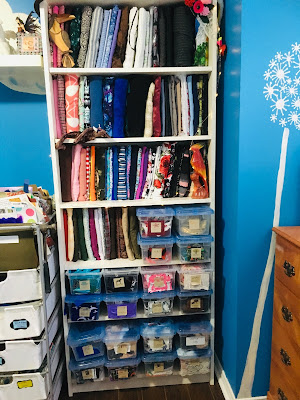
I used my Billy Bookcase, which mainly had my colour organized scraps on it, for the full sized fabric boards - organized by type and colour.


I reduced my scrap boxes to one per colour by a) throwing away scraps that wouldn't even make a band, b) scraps I didn't love, and c) wrapped up larger scraps on the comic boards.

So scrap boxes are now truly for binding sized scraps.

Look how organized it is!


I have some blankets, felt, and comforters (and my upcoming Taylor Trench fabric!) that were also folded onto comic book boards and placed in their own nook due to their bulkiness.


And finally my patterns were organized into magazine holders - el-cheapo at Ikea at 5 for $3.99.  I'm glad I bought 4 packs, as I used them all!

Patterns are organized by type (i.e. Home, Hoodies, Leggings, etc.).

And these are only the patterns I have used. Don't ask about ones waiting in the queue. 


Hopefully you have taken away a tip or two to help inspire you to organize even a small portion of your crafting items.  

An organized craft room makes for a more enjoyable experience doing what we love. 

Until next time!