Wednesday, 11 December 2019

Zip It - The Rebecca Page Zip Ornament Sewing Pattern Review

Santa Paws is Coming to Town!


When I first saw the new Rebecca Page Zip Ornament pattern, my first thought went to Fynn, our Ridgeback.  We've had a rough year, and he deserves an Advent Calendar.  

These Zip Ornaments are the perfect solution!  
- Reusable
- Closed (via the Zipper)
- Available in different sizes
- Super quick and fun to make! 
- A great scrap buster


I made all 24 of mine with the small pattern, after doing a quick test ornament (which I gifted to my dad already with a gift card inside). 

I went through my cotton Christmas scrap fabrics that weren't really large enough for a substantial project, and spent one evening cutting all of the circles and tabs.  

I had just enough zippers for all the ornaments (and ordered some back ups on Amazon for a steal - 50-5" zips for $20 for future projects). 

And I omitted the key ring option.

I used iron on fabric for the numbers, which I traced from the original Rebecca Page Advent Calendar.

I easily followed the pattern, sewed up every ornament factory style - the same step 24 times in a row, so all ornaments were on the same step at the same time.  This method of madness is SO much quicker than following the pattern over and over again for each single ornament. 


Next step was to fill up the ornaments with treats.  We don't really feed Fynn a lot of treats, so there were plenty of options. 

Fynn gets a variety of 4 different treats daily now.  And surprisingly enough, after almost 2 weeks, he hasn't taken the Calendar off the wall and chewed through the ornaments to get the treats.  So he is definitely a Good Boy. 

Side note, I got the Freeze Dried Wild boar treats when we found out Gideon had Osteosarcoma last December. He got those every day - both because they are boar, and secondly because the picture is a Ridgeback!  Fynn never had the boar treats before, as I haven't been able to open the bag since Gideon's passing in January. 

God, I miss that dog. 


For the Advent Calendar, I just cut out lengths and lengths of green felt and fuzzy white fabric based on the pattern pieces (from the Advent Calendar Freebie!), as I knew I needed to fill as much of the rectangle base as possible in order for the ornaments to all hang. 

For the rectangle, I used the same base as in the Advent pattern - the tree is just much taller. 

I took out my trusty Glue Gun, glued the tree on, and then sewed 24 old white and gold buttons onto the calendar - making sure I had enough room between them so the ornaments wouldn't touch. 

I even free cut dog bones and bows to finish off the top of the calendar. 


Usually around lunch time, Fynn will come up to my office/craft room, look at me, whine, and it's Calendar Time. 

He loves the treats. 

I loved that I was able to funk up the ornaments with trim and bling that I already had on hand. 


Good puppies get treats. 


As you can see, he's so patient for his treats - and I'm glad I was able to find the perfect pattern for a reusable Advent Calendar!  

Whether they are for a Calendar, Gift Card, earbuds, or small gifts, you'll love this pattern - get it here!

***Affiliate Links Above used - I love these patterns, and without the help of those who love their patterns, marketing would be extremely difficult for the pattern makers we love and learn to love. Affiliate links help with the hours, fabric, and tears that go behind testing each pattern in order to provide a real-person view on the patterns for you (and me!) 


Thursday, 5 December 2019

You Are Magic - The Bella Sunshine Designs Monroe Wrap Pants Sewing Pattern

Every Girl is a Goddess, why not dress like one? 


Introducing the Bella Sunshine Designs Monroe Wrap Pants.  A goddess style faux wrap style pant sewing pattern that is flowy and luxury all at once. 

And they're a REALLY quick sew. 

There are several options for the Monroe Wrap Pants:
- No-Cross or Full Cross Front
-  Full Coverage or Faux High-lo bottom hem
- Elastic casing waist band
- Capris or Floor length.


For my first pair, I used a really lightweight flannel fabric (from Fabricland) for the main pants, and a cotton red fabric I had in my stash. 

The flow is perfect, and I love the look. 

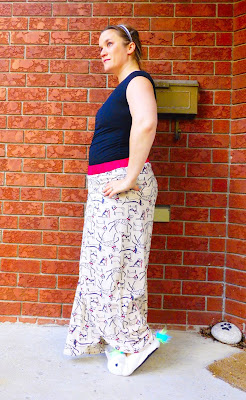
This is the Floor length, Full Coverage, Cross Front version.


I'm 5'-2" and didn't remove any length, so maybe I just have long legs for BSD patterns. Normally I have to remove length.  Thus, remember to look at the finished measurements, measure yourself, repeat to make sure.  


The wrap part works well in wind (it was a windy photoshoot) and doesn't come up all the way, so you won't be pulling a Marilyn Monroe in these. 

They are SOOO comfy to lounge around the house in - I'm using these as PJ bottoms due to the fabric type.  


Next are my Non-Cross Over Faux High Low Floor Length pants. 

I have no idea where this fabric came from. It could be as old as I am. It's like a light suiting fabric in Christmas Tree green.  These were my test pair. 

As you can see, there's definitely a Marilyn Monroe oopsie happening here, so make sure you're okay with a bit more thigh showing with the Non Cross Over version!


And when the fabric is thicker, like this one is, it's more difficult to get the sides to sit flat, as you can see in the picture. 

So no suiting fabric, apparently. 

Something flowy works best, and you'll be happy with your Monroes

Get you Monroe pattern here now!

***Affiliate Links Above used - I love these patterns, and without the help of those who love their patterns, marketing would be extremely difficult for the pattern makers we love and learn to love. Affiliate links help with the hours, fabric, and tears that go behind testing each pattern in order to provide a real-person view on the patterns for you (and me!) 

Dress to Impress: The Rebecca Page Patterns Phoebe Party Dress Sewing Pattern

Life isn't perfect, but your outfit can be. 

Introducing the Rebecca Page Phoebe Party Dress Sewing Pattern - the to-go 2019 Holiday Dress pattern!

I am in LOVE with Phoebe - the original, and all the Add-Ons.  

The FREE Original Phoebe Pattern includes:
- Original A-Line Dress Pattern with godet and Modesty Panel options

Add On Dress Patterns:
  - Fishtail Skirt
  - Tiered Skirt
  - Jumpsuit with Optional Side Modesty Panels
  - Layered Skirt
  - Maxi Pencil Skirt
  - Knee Length Pencil Skirt
   - Optional Ruffle Sleeve Detailing


Today, I'll be showcasing the Original Phoebe Dress and the Fishtail Skirt Dress Option.  

I even made the Betty Vintage Skirt (petticoat underlay) to boost up the Fishtail


The Original Phoebe Dress was a beautiful sew.  As always, FOLLOW THE INSTRUCTIONS IN ORDER!  If you want to know all the steps involved or are so superb at sewing that you require few instructions and pictures, there is a two page Quick Sewing Instruction Tutorial. 

I used costume satin (thin satin) for the fuschia portion of the dress.  I spent a whopping $18 for 6 Metres of fabric, and still have 2 metres leftover - I am VERY creative and efficient when I cut my fabrics out to get the most bang from my buck.

I opted for the Gaudets and Modesty Panels - in a lace fabric from Fabricland. I LOVE them in lace, as it gives such a nice and different flow than just sticking with the same fabric.  But you know me - I rarely have just one fabric for an outfit. 


The zipper really is easy to sew in as per instructions, and is straight in real life (I was pulling the dress forward in the pictures).  

As you can see, my caboose looks pretty amazing in this dress.  

I took 4" off the height, as I'm only 5'-2" tall.


This is the first Phoebe I sewed up, and without the modesty panel....well there's cleavage there - you've been warned!  

I did have to take a bit of length off the front of the bodice as the bust is designed for a slightly larger cup size. But I have to say from all the Phoebe pictures I've seen from other Sewistas, everyone's Ladies look spectacular!

  I did sew foam cups into the bodice as per instructions, and also suggest wearing those silicone "bras" that cover just your lower front bust (made specifically for backless tops/dresses) if your foam cups aren't thick enough to prevent a bit of a show in the front if it's cold outside. 


This is the Fishtail version of Phoebe - part of the Add on Patterns. 

I graded this from a Medium bust to XL waist/hips, and it's just the perfect fit - like a glove!

I used the same thin costume satin for the bodice and skirt, and the last of this beautiful brown embroidered satin type fabric that I've had for years (used originally for my Doctor Who Bolero) - both from Fabricland.

Doctor Who Bolero picture - because....DOCTOR WHO!


I was surprisingly delighted that, unlike typical Mermaid style dresses, it's easy to walk in, dance in, and probably do other things in. 

I altered the bust the same way as I did with the original, taking some length off the bodice front.  This helps keep the straps where they ought to sit, and prevents gaping.  There are great instructions for how to get the perfect fit for you, as we're all different. 


I also made the Betty Petticoat, but lowered the bottom tiers by about 6" so it would sit lower with the Mermaid style skirt. 

I think it's a cute touch, and poofs out the bottom with a bit more flair.


I also added a fun bit of lace around the waistline in black to bring things together a bit more. I also added the same lace in 3 lines at the bust, as this dress lacked the modesty panel...and I am not sure where I'm wearing this, but if it's at a work function, I felt a bit of coverage there would be beneficial. 

This is the skirt without the tulle.

I feel everyone is a Phoebe.  Which one are you? 

Get your Original FREE Phoebe Pattern on here, or delve into the beautiful Add-Ons here!

***Affiliate Links Above used - I love these patterns, and without the help of those who love their patterns, marketing would be extremely difficult for the pattern makers we love and learn to love. Affiliate links help with the hours, fabric, and tears that go behind testing each pattern in order to provide a real-person view on the patterns for you (and me!) 


Saturday, 30 November 2019

Dress to Impress: 5 out of 4's Layla Dress Sewing Pattern Review

Life is too short to wear boring clothes. 

That's why Layla is the perfect party, office, or doing-the-laundry dress!


The Layla Dress has several options and features:
- Fully lined
- Princess seamed bodice
- 4 Sleeve lengths
- Button up back
- A-line box pleated skirt
- Pockets option
- Sash option
- Knit or woven fabric skirt option


The layla was a relatively easy sew - just follow the straight forward instructions, and voila!  

The pleats were a nice sew, and the seam ripper did not come out!  I didn't have quite enough fabric for the entire front skirt with pleats, so I did make them a bit smaller than the pattern itself, ensuring that the front was the same size with less fabric than it would of been as per the original pattern piece. 

I used some Scuba fabric from Water Tower Textiles - and the scuba was light enough that making the sleeves didn't leave me feeling squished in, thus it has a great bicep circumference (mine tend to be large for more form fitted sleeves). 

The skirt is cotton fabric from Fabricland, and of course, I opted for the side pockets!   

Overall, it's a fun dress for work or a party, and I love that I can use woven or knit for the skirt part without needing to alter any of the pattern piece sizes. 

Get your Layla here.

***Affiliate Links Above used - I love these patterns, and without the help of those who love their patterns, marketing would be extremely difficult for the pattern makers we love and learn to love. Affiliate links help with the hours, fabric, and tears that go behind testing each pattern in order to provide a real-person view on the patterns for you (and me!) 

Tuesday, 26 November 2019

Get Your Beauty Sleep - the Rebecca Page Sleep Mask

Being a sleepy girl with a busy life is hard. 


The new Rebecca Page Sleep Mask certainly helps me zonk out easier at night though!

Make it as simple or as Intricate as you like!  

With templates for eye lashes and your imagination - the sleepy sky's the limit.


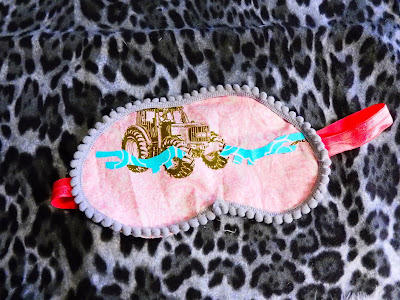
I added pom pom trim and fluffy feathery trim to mine - the fluffy trim definitely tells people you are sleeping though (it moves as you exhale - ha ha).   I took out my glue gun for these trims, although they could easily be sewed on.  With minimal wear and tear, I feel my Dewalt glue gun's power will hold on these trims for many years. 

I used iron on fabric for the eyelashes, but you can embroidery them on or even sew them on if you're so inclined. 

I used elastic for my nieces masks, and ribbon for the adult masks (for my friend and I for Girls weekend at the cabin). 

The main fabric is just plain woven cotton fabric scraps I was gifted. 


The backing is a nice satin lining scrap - red to be scandalous!  It's SUPER soft on my skin.  

As long as you use lots of pins before sewing, satin is relatively easy to sew with, and leaves a comfortable finishing touch. 


I was really tired on Girls weekend after Mimosas, so the Sleep Mask really helped me sleep in the middle of the day with no curtains up in the cabin. 

Great gifts or for yourself - betcha can't just make one!

Get your own Sleep Mask pattern here.

***Affiliate Links Above used - I love these patterns, and without the help of those who love their patterns, marketing would be extremely difficult for the pattern makers we love and learn to love. Affiliate links help with the hours, fabric, and tears that go behind testing each pattern in order to provide a real-person view on the patterns for you (and me!)