Thursday 28 June 2018

Sewing Pattern Review: Mamma Can Do It Classy Woven Tank


We all have woven fabric that just sits waiting to be used in a pattern. 

With so many pattern makers creating designs with knit fabric, it means our woven fabric just waits. And waits. And waits.

There are so many great woven designs at a fraction of the cost of knit fabrics. 

Thankfully a few designers recognize this niche, such as Mamma Can Do It!


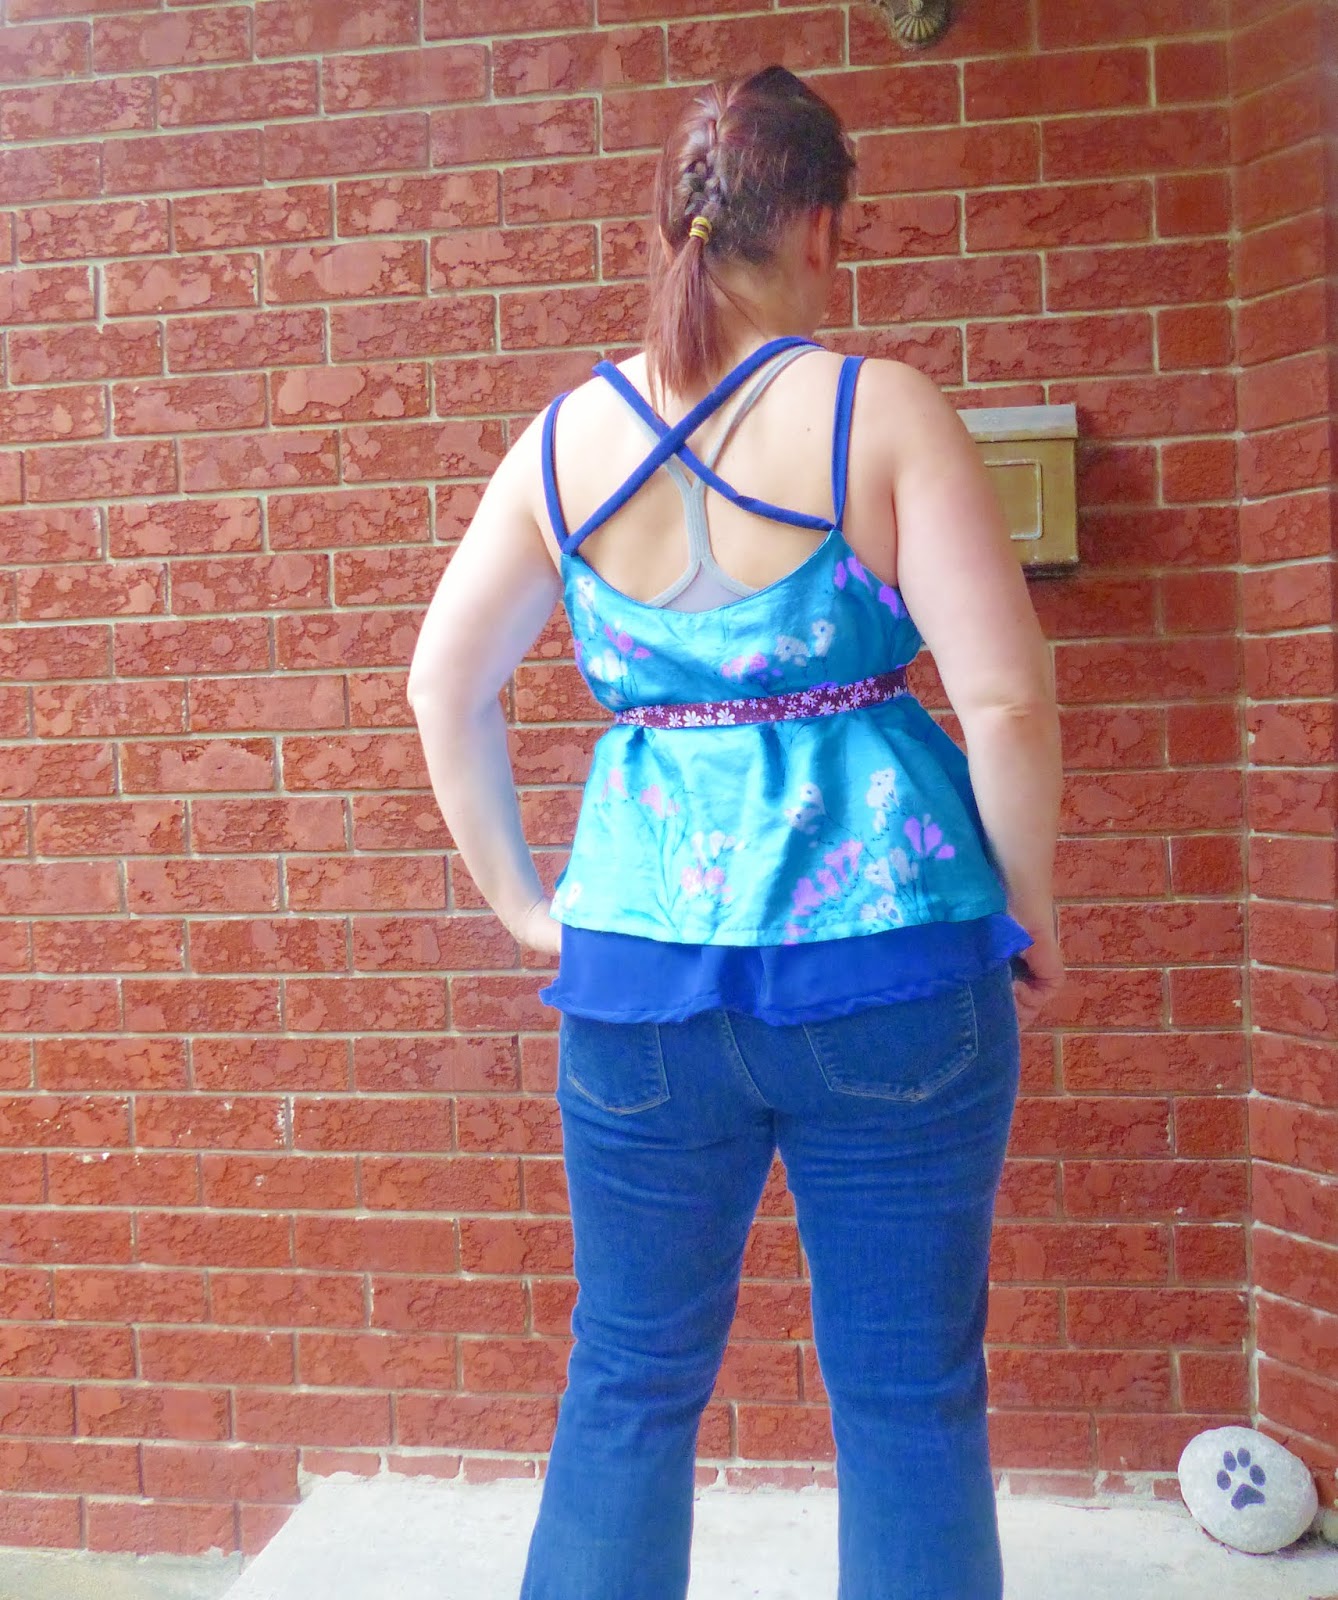
She has designed a simple tank top pattern that fits well...real ladies - the Classy Woven Tank


It hides tummy confidence issues while showing off my curves in a flattering way.


Heck - the first time I wore it in public, my friend complimented me 3 times that day on my new top!  What a confidence booster :).

The back covers just enough of my behind, and it was easy to grade between sizes to fit my waist and hips properly (between 6 sizes from bust to waist/hip).
  
The curved hem is super flattering all around

And look how great it looks with my Eden Leggings!

And of course, Husband tries to make me laugh while taking photos in our forest (we own 6 acres of Land in Quebec, Canada, which we frolic in on weekends).


Overall, the sewing took less than an hour, and the end result was surprisingly perfect.

The darts for the bust are perfectly placed and easy to sew, and the binding instructions were quite detailed. 

This pattern is perfect for the beginner sewist looking to sew up their beautiful woven fabrics, or the expert looking to add a few more simple tank tops to their wardrobe this summer.

I used a light woven linen random fabric obtained from my mother-in-law's sister (just in case it was a flop), and the pattern just makes the fabric pop. Like they were made for each other.

Seriously!


Grab your Classy Woven Tank Pattern here for only $7 -and remember to Sew On!


Monday 25 June 2018

Sewing Pattern Review: Rebecca Page's Monte Carlo Top (or Dress!)

I'd been coveting my Activewear Spoonflower custom Rhodesian Ridgeback fabric since last year.

The intent was a cycling jersey.  The reality of Vestibular Migraines = no cycling in my near future due to balance issues.

So when I saw the Rebecca Page Monte Carlo Tunic to Maxi Dress Pattern, it was calling for my Ridgeback Fabric.

I'm not generally a dress person, but the tunic length seemed perfect for me.


Some of the highlights of the Monte Carlo include:
- Knit or Woven Fabrics can be used
- Tunic, Knee, or Maxi length
- Shirred or elastic casing back
- Wide or narrow straps
- French Seams (which I'm learning to love)
- Ruffles (option)
- Sizes XXS to 5XL

I opted to sew up the tunic length with wide straps.


I think it turned out great - and it's not my last Monte Carlo!

The length is perfect for me - hitting just below my hip (which is how I like it).  I am 5'-2" just so you get the idea of length.  The pattern is drafted for a 5'-6" high frame, but rarely do I take length off a top due to personal preferences of covering my booty.

The front is definitely boobalicious, so I sewed a couple of tacking stitches to keep the Girls in place.  A bigger bust would definitely keep things in place more naturally as an FYI.

I opted for straight straps, as cross overs aren't nice for my neck and shoulder issues - it's comfy and the straps stay put without having to put them back in place (yay!). I could raise them up an inch at the back to prevent my bra from showing, but most of my bras are lower in the back than the particular Lulu bra I was wearing for pictures.

I'm the proudest of a new technique I learned - shirring.

When I think of shirring (once I googled what it was), I thought of those fancy tops I wore as a kid on photo day. So 1980's retro and early 2000's dance/rave scene club tube tops (sorry, Dad!).

I'm ok with this.

The shirring instructions were on par and easy to understand with step-by-step pictures and verbiage which held my hand the whole way through. (thanks, Rebecca!)

And guess what? It turned out perfect and even looks a bit professional! 


So overall, I'm happy with the look and feel of the Monte Carlo - and due to using Dri-Fit type fabric, I can actually work out in this fancy top, look (safely) boobalicious, and sweat without looking like it.

It does come in a few other options:

Friday 22 June 2018

Sewing Pattern Review - Rebecca Page Chloe Cami


On Sale throughout June!


30% off Ladies, Girls, or Doll Separates


37% for ALL 3 patterns (Ladies, Girls, AND Doll)


I love a nice flowy top that is kind to my hiding abs. And I really dislike sleeves in the summer (that's what a nice cardigan is for!). 

I also normally go for tunic or bum covering length tops, but went outside my comfort zone for Rebecca. 

That's where the Chloe Cami comes into play!


This camisole is different from others, and I love that it's made from lightweight wovens!  I made two with different random fabrics - lightweight silk, lightweight crepe, and two types of flowy polyester mixes - all with different results - in a good way.  

You can opt for one or two layers with two lengths of top - mine both have both lengths and two layers. 


The straps are easily adjustable, but I didn't need to adjust (I'm 5'-2") - and work best with at least one set of short straps, and a set of longer criss cross straps - the straps don't put pressure on my neck or shoulders (my problem area), which is a relief. 

You can use a single or double side strap or double criss cross straps if you like as well - I like the look that I went with just fine. 

As you can see, your bra straps will show, but you can go strapless, or wear one of your sassy lace bras to let it show through!

I made my blue top straps as per the pattern (with fabric), but went all lazy and used lace for the floral top. I feel it worked out fabulously and gives it a very girly look.  


Wearing with my lacy Made for Mermaids Bra


The french seams are easier than you would expect to sew - and a good introduction to sewing them - they make for a professional finish. 

I hemmed the bottom of my floral top orange fabric with lace, as the fabric was stiffer than anticipated and I ran out of Wonder Tape to to iron the hem flat before sewing. The hem looked wonky, so I fixed it with something pretty!


Pairing the top with jeans or shorts works best for my style, and I find my crepe fabric on the blue top(stiffer than anticipated) billows up, so a quick fix with a matching sash or belt below my bust gives the top a totally different sassy but controlled look.  


Use up your pretty lightweight wovens with this cami and go out afterwards to celebrate your new pro looking stylish top!


Sew On!


My First Barbie and Monster High Sewing Outfits!

So I have decided for my nieces birthday to sew her up a wardrobe for her Barbies and Monster High dolls.


The last time I saw them, they were sadly wearing scrappy outfits from our Barbies circa 1980-1990! 


I don't think her Monster High Dolls have any new outfits.


So, I ordered a Monster High and Barbie doll from Amazon.  My, the quality on the lesser pricd ones is definitely subpar compared to mine - at least the dog could take my Barbie without fear that her arm would go missing! These ones are made from a hollow plastic vs the dense rubber weapons they were back in my day.


I totally just said, 'back in my day."


I'm officially old.


Ok, so the first item I made was a Free T Shirt I found on Pixie Faire.


If you haven't sewn before, the instructions may be missing a few steps for seing the hems, but they are straight forward and easy otherwise.


Sewing Barbie clothes might *NOT* be advisable for beginners though, as those darn hems take time to get right.


For the collar, I deviated from the pattern, and made a band (like I would for my own clothes) by measuring the neckline, cutting a small 1/2" wide piece of stretch fabric, folding in half wrong sides together, and placing right sides together along the neckline.


I then topstitched once I flipped the binding upwards to keep it from folding forward and for a more professional look.


For the back, it calls for Velcro.


I cut a piece of velcro in half lengthwise for a smaller width, and sewed on as per directions.


I then added some rickrack to give it a neater look.


Not bad for my first Babie clothing item in 25+ years...


For my next clothing item, I opted to see if I could downsize the Rebecca Page Cora Cocoon Cardigan I made for myself.


I mean, there's an 18" doll pattern, I just had to amend it to a smaller height.


I kind of goofed with thinking for some reason the Monster High Doll would be 14" (she's about the same height as Barbie, at 11.5"), so I set my printer to 77% to shrink the Doll Cocoon pattern pieces to the "proper" size, however, it turned out a bit bigger than anticipated.


Calculating 11.5" by 18" should actually be printed at about 65% to the pattern sizing.


I finished my first one last night in a nice light stretch Cotton Lycra, and although a bit big, it was simple to make.


I cut an inch off the perimeter of the Cardigan portion of the pattern piece, and 2" from the band piece this morning. I was honestly too lazy to go down 3 flights of stairs to reprint the pattern at 65% of the original pattern piece.


And I wanted to sew one more up this morning as we're heading to the camp tonight right after work.


And I started at 6:36am and finished sewing by 6:51am, giving me enough time to snuggle with my ailing Husband (just a minor injury) before heading downstairs to my office.


The second one is from a lightweight knit that has minimal stretch either way, but still works on a looser knit pattern.


This one fit much better - although I'll just reprint the pattern now as the arms are still a tad bit long.


Kids don't care though, and I have 3 nieces to makes Barbie and Monster High clothes for now.


Because I didn't have enough hobbies or sewing projects to work on apparently.


*sigh*


Sew On!


and stay tuned for more Monster High and Barbie clothing - definitely great scrapbusters and I look forward to sharing my experiences with you!


Thursday 14 June 2018

Free Sewing Pattern - Rebecca Page's Animal Pillows

I'm trying to spiff up the trailer for this weekend, as we are having about a dozen guests up for a canoe trip down our river.


SO what do I do?


Sew.


I've had Rebecca Page's Animal Pillow Pattern for eons now, but haven't sewn any up...until last night!


Aren't they cute?


There are 4 choices:
- Bird
- Butterfly
- Cat
- Rabbit


As we are owned by 3 parrots, and butterflies seem to be prolific at the Cabin this year, butterfly and bird it was.


But birds like to be in pairs, so I had to make two.


I added a lace body and rubbon tentacles to the butterfly as per the patterns, and used iron on fabric for the bird eyes (instead of embroidery) and ribbon looped for their tails.


Honestly, the most tedious part was stuffing the pillows. The overall pillows were a quick sew, and the are huggable size.


I used coveted baby fleece  for the turquoise bird, and some cotton fabric I got from my Aunt-in-law (?)'s stash from when she moved recently.


And of course, when I went to move the pillows for a different chair photoshoot, this happened:


So needless to say, Gideon has claimed the blue bird as his own.


They are dog safe though - no eyes or buttons to pull out, thus in turn, are child safe.


Right?


So grab your Animal Pillow pattern for FREE now at Rebecca Page Patterns - you'll be pleased with the end results.


Sew On!


Wednesday 13 June 2018

Sewing Pattern Review: Rebecca Page's Cora Cocoon Cardigan

Who doesn't like wrapping themselves up in a cozy blanket after work (during work), or on a drizzly chilly day?  

I know I'm always cold, so having some sort of sweater or wrap is a necessity staple in my wardrobe. 

Rebecca Page's newest pattern, the Cora Cocoon Cardigan definitely meets my requirements!  


It's an extremely simple sew with a lovely drape which Husband compliments every time I wear mine. 

He says, "It's so you."  

So I guess I'm comfy and cozy!


There are a few sleeve options: sleeveless, 3/4, or full length - keeping in mind that the sleeve essentially starts at the elbow. 

Fabric is key to ensure there is enough stretch that the arms aren't too tight. 

I opted for a lightweight sweater knit, and there's plenty of stretch, but also good recovery, so it's comfy on the arms and all around. 

Don't use a structured or stiffer knit - it will make the cardigan boxy and not flow well - lightweight is key! (the pattern gives plenty of suggestion). 

This cardigan takes well under an hour from cut to sew (faster than doing laundry!), and you'll love wrapping yourself in it once complete.

Really, you'll hug yourself A LOT when you wear it!  

The drape on the back is perfect, as it covers my booty, and it flattering. 


And guess what? There really is no top or bottom - it's mirrored, so you can't wear it the wrong way.

Husband has no idea how to hang it (I hang it up like a scarf around the actual hanger hook part), but it's not that confusing. 


And guess what? It's on sale through June! 

Dolls (30% off)

Child's (30% off)

Ladies (30% off) 

Bundle (37% off)

Tuesday 12 June 2018

Easy Removable Bra Cup Sewing Tutorial

While making the Rosanna Tankini, I really wanted to have removable Bra Cups. 

Why?

They're expensive to buy.

Even to make them, the foam is expensive.

And Why not?

It's really simple when making a bra or pattern with a built in bra. 

First off, cut an extra front bra piece, minus the entire straps.  I like cutting up until there's a 2" gap to fit the bra up in from where the strap normally would be. 

I used "swim," or "athletic," lining to create this layer. 


Next, baste the sides together as shown below, including the arm curve, and follow up by basting the neck curve.

Make sure to leave an opening between either side of the straps (essentially the part of the strap that is cut off) and the bottom, as pictured.


 You're ALMOST done!

I like to sew a middle seam line so the cups stay where they ought to. 

Once your top or bra are complete, just slip the bra inserts in through the holes you left at the straps, and they're just as easy to take out. 


If you really want to get fancy, you can do some ruching and place an elastic in the middle while stretching it (not the fabric) and sewing the line - but it depends on the look you are going for. 

Ruching Ties are relatively simple, but only really practical if it encompasses all layers of the fabric (not just a built in bra where the exterior top is meant to be flat. 
Center ruching

Center ruching


Flat Front (aka no ruching, but built in bra) 

Alternatively, you can sew your cups into the lining or Bra fabric by trying your bra on, pinning the cups inside (without stabbing yourself with pins), and use the zig zag stitch to sew around the circumference of the cups. I only do this with cheapo cups, otherwise it's the "sharing is caring" method of removable cups. 

Sewn in Cups

Happy sewing!

Sewing Pattern Review: 5 out of 4's The Rosanna Tank, Tankini, Dress, and Swim Dress


All I want to do when I wake up in the morning is see your princess seams.

Rosanna, Rosanna.


Never though that a tank top like you could ever care for me, Rosanna...

But she does! 


5 out of 4's newest pattern, the Rosanna, can be sewn into a multitude of styles:
- Tank top
- Tankini
- Dress
- Swim Dress

So far, I have opted for a few different styles and experimented with several fabric types. 


The options included with the Rosanna are:
- High or low scoop neckline (I opted for Low scoop necklines, as I am risque!)

- Peplum, Swim, Short Dress, or Long Dress 1/2 Circle Lengths

- Peplum, Swim, Short Dress, or Long Dress Full Circle Lengths

My first choice was the Swim Top, made from random spandex fabric from my sister's stash. 

I used the 1/2 Circle Swim Skirt, and even added in pockets for removable bra cups - those aren't cheap, and I prefer just swapping them between outfits. 

Here are the instructions for the removable bra cups.


Look at that scoop!
 I really like the coverage, as I'm not too confidant about my legs. This swim top definitely makes me feel sassy!


Finally, I paired my top with the Reversible Riptide Swim Shorts - they are so comfortable, and my go-to swim shorts. 

For my next version, I sewed the Peplum Top version.

I meshed together some Star Wars Cotton Lycra, lightweight Double Brushed Poly with the Star & Floral fabrics. 

I love the drape, and that the skirt isn't a fabric hog. 

The princess seam is beautiful and sits flat each time I create this top. It's an awesome scrap buster too, so will co-ordinate with multiple outfits that I've used the same fabric with. 

The skirt doesn't do anything funky (like make me look bigger in the belly), and doesn't fly up in the wind either. 


 And finally, I created another Peplum with some leftover Liverpool  (floral) and Cotton Lycra (maroon)

Again, I sewed this top with the removable bra cup option - perfect for this back when I'm not wearing a lacy bra. 

The seams sit flat, the armcycle is perfect, and I love the drape. 

I made a funky back on this top, using stretch lace instead of the pattern's binding for the strappy back option - try it out - it's SO much easier, and looks really pretty. 

I paired them with my Zen Pants, another 5 out of 4 pattern.


 I recommend learning a new skill (the Princess Seam), and making yourself a few new flattering additions to your wardrobe this summer with the Rosanna - Grab it now!