Thursday 25 April 2019

Shout out to the T Dot! Rebecca Page's FREE Toronto T-Shirt Sewing Pattern Review

Did you know that when I was 18, I moved from Ottawa to Toronto, and stayed for 11 years?

And even though I've been back in Ottawa for 11 years, I still consider Toronto home. 

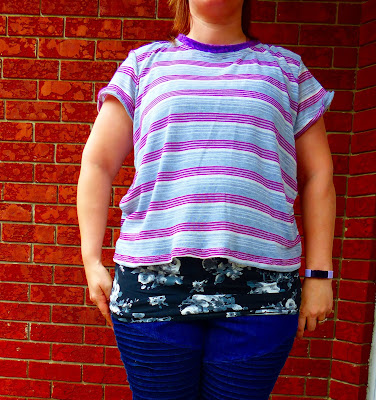
When the Rebecca Page FREE Toronto T-Shirt came up, I knew I NEEDED to create it! 


...And then I did my best Toronto-esque photos possible.


Did I mention this pattern is free?  You can't beat that! 

And a few days after making these lovelies, I was walking from the office for coffee through the mall, and this is definitely THE CURRENT STYLE.

It's a loose fit t-shirt with a short bodice, perfect for layering in any weather! 


Do your best Zoolander look in your Toronto T-Shirt!

You can practice your Tree Pose in your Toronto T-Shirt!

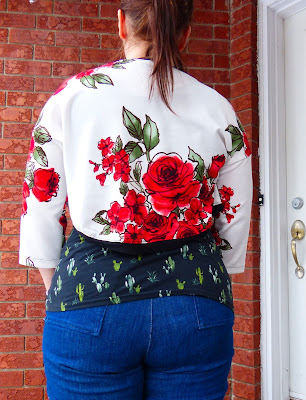
For this particular t-shirt, I mixed up fabric makers - The Fab Clique had a super sale on knit fabrics, so I picked up the back fabric (white with butterflies) for a steal. It's a nice super flowy lightweight cotton lycra


And as usual, the front fabric is from Water Tower Textiles, a lightweight 2-way stretch bamboo fabric.

With the Toronto T-Shirt, LIGHTWEIGHT fabrics are best - otherwise, it will have a boxier look. I prefer the flowy look.


The Toronto T-Shirt is a HOOT!


I paired my Toronto with my hacked Slim Fit Cargos and Strappy Cami.


I normally grade for my hips/waist - from a Medium Bust to XL Waist/Hips - with Rebecca Page Patterns, but with the loose fit of the shirt, I didn't grade, and kept this at a straight Medium.


I'm happy with the non-grading choice - it would of been WAY too flowy for my liking otherwise.


I didn't have to really pay attention to the instructions - this sew is really THAT easy! 

The armcycle isn't tight and perfect for my larger biceps - so all around I'm happy with the comfort level.

The fabric for this top is a loose sweater knit, also from Water Tower Textiles.  A great find as they clear out their winter fabric for summer flair.

And as you can see in the second picture above, the Toronto T-Shirt means getting bored of the Paparazzi .


The side view gives you an idea of what the top is like with a loose knit and no grading - I like it!


And the back drapes nicely over my big caboose.

So all in all, take a chance on this FREE Rebecca Page pattern, and be stylish like you're a true Torontonian!


***Affiliate Links Above used - I love these patterns, and without the help of those who love their patterns, marketing would be extremely difficult for the pattern makers we love and learn to love. Affiliate links help with the hours, fabric, and tears that go behind testing each pattern in order to provide a real-person view on the patterns for you (and me!) 


Monday 22 April 2019

I'm Just a Vintage Soul - The Rebecca Page Vintage Blouse Pattern Review

Get your happy on with Rebecca Page's Very Vintage Blouse!

It's the modern twist on a vintage vibe blouse.

Options include:
- Billowy or straight sleeves
- Gathered or darted bust
- Plain or pintucked bodice
- Short or long cuffs
- Round or Pointed collar


It is also part of The Blouse Collection - 4 patterns for one price (40% off regular price!!) - click on the blouse to bring up my blog posts for each blouse!
- Very Vintage Blouse
- Madison Blouse
- Brielle Blouse
- Riviera Ruffle Blouse


It can be worn alone as above - I paired it with my hacked Slim Cargo pants - to show all the proud sewing you have completed.


Since making Rebecca Page clothing, I have gotten really good at plackets, hidden seams, and all the professional touches each pattern teaches me.


I opted for the gathered bust, plain front, regular collar, and normal sleeves as I was running low on time and wanted to ensure my blouse making skills were still intact.

I really love the gathered bust, as it showcases such a feminine vintage flair within the blouse.


You can also office it up by adding a sweater vest - yes, I just said sweater vest.


I've given up being freezing when I'm in the office. And I felt my hacked Vivianne Sweater from Halla Patterns was appropriate.


The back is a bit wonky - I actually made a centre seam and took it in 1" on either side as the top was too billowy at the back for my liking. I should of stopped just below my waist, as you can see, my hips aren't too keen on keeping the back down.  Meh - it still looks good and is SO comfy.


Fabric - some random shirting fabric I got for making a shirt for Husband - but he dug his feet in (he's SO picky with clothes and is a weird shape), so I am just using his fabric.

Fair is fair.

See the side view where the gathered bust area is - LOVE! 

And the armcycle is comfy and not too tight - my biceps seem to be hulk like with some patterns (bust size doesn't always equate to proper bicep circumference with slimmer fitting sleeves).

Oh Rebecca, you certainly do know how to woo a woman!

I really do wish my life had background music so I could tell what the heck is going on - but until that technology happens, I'll sew on - will you sew your Vintage Blouse on too? 


***Affiliate Links Above used - I love these patterns, and without the help of those who love their patterns, marketing would be extremely difficult for the pattern makers we love and learn to love. Affiliate links help with the hours, fabric, and tears that go behind testing each pattern in order to provide a real-person view on the patterns for you (and me!) 

Bring on the Waves! Rebecca Page Patterns Riviera Ruffle Blouse Review

Just another day on the Riviera where every hour is happy.


One of my goals this year is to sew up the patterns I have now and cave into only the best of the best mid way. I'll be happy with a 2-1 ratio (sew 2 I own, obtain 1 new trend to sew).

Rebecca Page's Riviera Ruffle Blouse pattern sat in my to-do bin for a good year before I decided to sew her up (FINALLY) last week.


The Riviera features:
- Sleeveless or Flutter Sleeves
- Beautiful cascading front ruffle option (or ruffleless!)
- Side cut bias panel options
- Sizes XXS to 5XL
It is also part of The Blouse Collection - 4 patterns for one price (40% off regular price!!) - click on the blouse to bring up my blog posts for each blouse!
- Very Vintage Blouse- Madison Blouse
- Brielle Blouse
- Riviera Ruffle Blouse


I opted for the flutter sleeve, full ruffle, side bias panels.

The main fabric is a sheer random fabric that was in my stash  already - which paired with a tank top year round or bikini top in the summer, makes this pattern even more elegant.

Honestly, the flutter sleeves are repurposed from one of the last remnants of my clubbing days in Toronto - a La Senza skin hugging, mid-thigh "nightie" that I will never fit into again (goodbye size 2 days). But the pretty meshy overlay was too pretty to dispose of. It seems to pair well with the black sheer fabric I used!


I also paired the top with my hacked Slim Fit Cargos (tutorial to come soon!). 

The Riviera fits perfectly, and grading from Medium bust to XL for my hips makes this top hug my torso in all the right ways.

The only thing I would change for next time, is to lengthen the top to at least mid-behind - I prefer longer length tops.

But seeing as it's really a layering top due to my fabric choice, it's not a huge deal for my first Rivera.

 The side panels are beautiful - like princess seams - and I like that it's an added option. 


All the steps were well laid out in the instructions, and I didn't have to take out my seam ripper once.


The front ruffle cascades beautifully as well - giving the top a nice feminine touch.  Without the ruffle, it would be a more neutral look.

Tip: DEFINITELY use light fabric - anything that doesn't cascade will leave the ruffle looking boxy and forced, and won't be as light and delicate as mine is.

Just a head's up for those wanting to use quilting cotton or similar stiffer fabrics. For the main portion of the top, those choices are fine, but you'll want to use a complimentary light fabric for the ruffle.

Overall, I'm happy with my Riviera, and it's the perfect addition to my summer attire - hopefully yours too!

***Affiliate Links Above used - I love these patterns, and without the help of those who love their patterns, marketing would be extremely difficult for the pattern makers we love and learn to love. Affiliate links help with the hours, fabric, and tears that go behind testing each pattern in order to provide a real-person view on the patterns for you (and me!) 


Friday 12 April 2019

Stay Fancy: 5 out of 4 Patterns Nora Bolero Pattern

Life is a party.  Dress Like it. 

5 out of 4's newest pattern - the Nora Bolero - is a quick and easy fancy sew.

In my office, it's freezing. At home, it's freezing - I'm just always cold.  So layering is a must. 

But sometimes a cardigan or hoodie just don't make me feel fancy enough.  But a bolero - it does! 

This bolero includes:
- Lined or unlined versions
- Banded or non-banded finish for hems
- Short dolman sleeve, elbow, 3/4, or long sleeves


The Nora is a relatively quick sew - you can easily whip one up in under an hour - quicker than a load of laundry! 

The instructions are simple to follow (two pages for either version!), and the 5 out of 4 Facebook Group peeps can always assist if you get confused


As you can see, the bolero works for a fancy dress and sexy knee highs, or just a casual day around town. 

I opted for the 3/4 length sleeve unlined version, and I love it! 
The front sits at my bust, and actually stays put - pattern drafting at its best!


The back sits well on my shoulders, and there's no weird bulges. 

I opted to not grade from my bust - normally I grade from Small bust to Large Waist/Hips for 5 out of 4 patterns, however, I found grading was unnecessary with the Nora, as it's more of a bust hugger and just touches my natural waist.


I paired my fancy-looking Bolero with the Virginia Dress (which of course, has pockets!), and it works quite well.


The armcycle is so nice - not too loose or tight - sometimes my biceps are just too darned big for sleeves and there's a 50/50 chance I need to do a bicep adjustment on the pattern piece. 

The sleeves on the Nora are meant to be a bit looser - so if you do prefer a tighter sleeve, you can certainly take 1/4" or so off to accommodate this preference.


My main floral fabric is Liverpool from Water Tower Textiles - it was on sale due to some sort of flaw in the pattern....I still have yet to find the flaws, and scored a good 40% off both times I ordered it! 


The band is from an Etsy fail - some sort of weird wrap around lingerie spandex thing that I could never figure out.  But the fabric is nice and soft - and made the perfect band!

Overall, I can't wait until I have time to make more Boleros - like a long sleeved for the office from sweater knit, and a nice cotton lycra for the summer to hide my shoulders from the sun, but keep me aerated throughout my core.


Ready for Spring - The Taylor Trench Coat - Rebecca Page Patterns Review

Unique & different is the new generation of beautiful.  You don't have to be like everyone else. 

I have a secret. 

I have a coat fetish!

I partook in the recent Taylor Trench Sew-A-Long, and finally made the Taylor Trench coat by Rebecca Page Patterns

Working a little bit at a time every day made the experience less daunting - and within a week, she was sewn up!  

Taylor has many options:
- Welt or patch pockets (or none?)
- Optional Shoulder tabs and belt
- Optional HOOD
- Mid-Calf or Mid thigh length options
- Front & Back Yokes
- Lined interior
- Optional hanging Loop


I opted for the mid thigh length coat with: hood, welt pockets, and belt.


Look how good it turned out!!


The front has 10 buttons - I purchased from 204 Fabric n Stuff on Etsy - 2 packs of buttons were suffice, and I love the quality and colour. 


The welt pockets did take some time to sew, but follow the instructions step-by-step, and they should come out perfect (or near perfect!).


The belt is a bit shorter than I expected, but long enough to tie in two knots to stay put.


The hood has a centre piece and two sides, and I love the way it looks.  I have worn it out in the wind, and it stays put without flipping off.  So despite it looking a bit big, it's the perfect fit.


The back has a lovely yoke - with another button!  It also has a vent - which you definitely need to read the instructions, and then sew in order to wrap your head around it. 


Vents are the bane of my existence! 


I really like how the collar stands up when the hood is up - it's such a professional touch.


The fabric I used was a random coating fabric from Fabricland, and a beautiful clearance cotton woven parrot fabric I found on Fabricville - perfect for my parrot life in my past career!


I paired my Taylor with my modified Slim Fit Cargos and Vintage Blouse.


Sew go ahead and take a leap of faith with your sewing skills, and level up! 


Sew up one step a day, and you'll be finished in no time! 


It's not a beginner pattern, but I feel anyone can sew the Taylor Trench with time and concentration.


***I sew for the passion, fun, and confidence it gives me. Affiliate links have been used, but I only promote what I believe in and adore ***


Monday 1 April 2019

Rawr - Means I Love You in Dinosaur (and the Cutest FREE Rebecca Page Pattern to Date!)

Let me introduce you to Rawr!  The cutest cover model you'll ever meet (seriously - he's the cover of this Rebecca Page Pattern!).


With options for either a Dragon or Dinosaur, your little ones will be training their dragons (or flying them like Daenarys) and snuggling their dinos before you've had a change to finish up your last ladder stitch! 

The perfect FREE pattern for using up scraps of woven fabrics and interfacing - and the perfect partner for the Rebecca Page Unicorn Pillow


I mean, one can NEVER have enough pillows.


Okay, I'm an adult. With no kids. And I'm not giving up either my Dragon or Dino - they're just so stinking cute!


The Dinosaur is like a Stegosaurus Brontosaurus mix, and I'd say the most time consuming part is the cutting - so be prepared for little details here.


I used some random lightweight cotton fabric for his body.


His nails, mouth, and eyes are created from iron-on fabric (I purchased mine at Wal Mart - the only place I seem to be able to find it).

I used my Sharpie markers to draw in the red of the mouth (hence cute little teeth), and the colours of his eyes.


Each spike is hand cut with iron on interfacing between to allow them to stand up straight, made of baby fleece fabric.


In total, there are 14 spikes - so a bit of work to cut out, but worth the end result. 


Stagger the spikes as pictured, and voila! 


My dragon is pretty magical - created with some sort of teal galaxy cotton fabric for the main body, and sheer shimmery fabric for the wings.


You can be as creative as you want with either the dino or dragon - and I went all out for Draco the Dragon


He seems to appreciate it - just look at the fun he is having! 


His mouth, teeth, and eyes are also made from iron on fabric - the teeth are separate this time to give them that large scary look.


His eyes I drew in with Sharpies, and he has a nice shimmery gold sparkle pen eyeliner that any girl would be jealous of.


His nails are cute and created with velvet scraps - I wanted to keep the shimmery flow throughout my pillow.


And his spikes are made from a purplish shimmery fabric with an inner iron on interfacing to keep them standing upright.  Thankfully there weren't as many spikes as there were with the dino.  I think that's why I spent the time on the little add ons for Draco. 


See how sparkly his wings are?  I added on sparkle lines with glitter pens, and I glue gunned a line of turquoise lace where the wings meet his body.


Do be sure to hide the pillow(s) if you do use glitter pens, as they really ought to dry over night before being handled! 


Overall, I thoroughly enjoyed creativng both pillows - it's a nice change from sewing up clothing.


The instructions were well written and the pictures help a lot for more novice seamstresses.


Go here for your FREE Dinosaur/Dragon pillow pattern, and Rawr it up!


***I sew for the passion, fun, and confidence it gives me. Affiliate links have been used, but I only promote what I believe in and adore ***